(Auto-)Mount Network Shares On Linux
This blog post was originally intended for just a couple of friends and XNL Team Members which just recently switched over to Linux from Windows for the first time, but I thought it might actually be useful for others also, which is why I decided to rewrite it a bit so it could potentially also help others with issues when (auto)mounting network shares on their Linux.
IMPORTANT NOTE: Please do realize we all either use Kubuntu or Ubuntu (currently 24.04 LTS) and thus this tutorial also applies to those distros. While most of the tutorial should be applicable to other distros, stuff like sudo apt install… will only work on Ubuntu (or Debian) based distros. Make sure to adapt the commands to your Linux distro if needed.
Bonus: This solution also solves kdenlive network issues for example
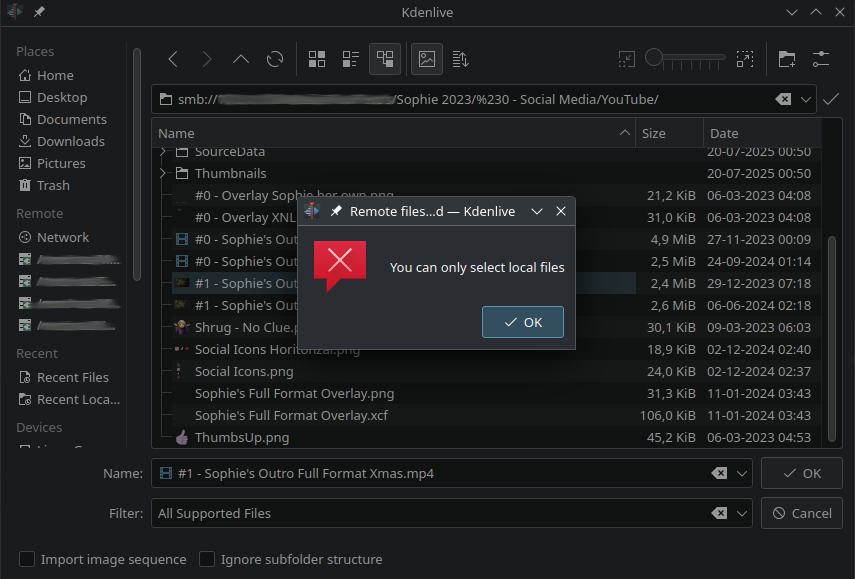
If you are for example trying to import video files from a NAS (or regular Network Share for that matter) in a program like kdenlive, then you might encounter an error like: “You can only select local files”. And when dropping them straight from Dolphin (or other file browsers of course) onto your timeline, it might even be that nothing happens at all (without any errors).
If you however would mount the network share on which the files are stored as ‘local mount point’ (either via auto mount in fstab, or just by manually mounting it in the terminal for example), then these issues are instantly resolved. And I can also confirm that working with LARGE video files (MTS, MP4, MOV etc) of multiple GB’s and with bitrates over 50mb/s will work perfectly fine (with our local network running mostly at 1gbs) when using kdenlive.
This might (and will most likely) also apply to many other programs which would otherwise either refuse or be incompatible with using files directly from an smb:// share.
Don’t know what these terms like fstab and smb:// mean? No worries, just follow this tutorial and I will explain it as simple as possible 😊.
WARNING: On smaller screens/lower resolutions, some of the longer commands/lines might look like ‘two commands’, so please make sure you type the entire line if stuff seems oddly wrapped on your screen. Basically each command (or fstab line) you’ll have to use which is ‘wrapping’ to the next line, can in most cases be considered as ‘one long command/line’
Introduction
So as stated above, I was originally asked by some people to make a simple and beginner friendly ‘tutorial’ on how they could map network shares during boot of their Linux machine.
They had found some tutorials which shown that they could just add the credentials (username and password) to a file names fstab, and then the network share would mount ‘just fine’ and ‘auto login’ on it.
Well while they are technically correct, and you can indeed “just” add the credentials to your fstab, this is NOT recommended for security reasons! This because fstab is basically readable from/for ANY process and user on your system!
What the heck is fstab? No worries, we’ll get to that a bit further on 😉
For security reasons it is recommended to instead make a bit more secure credentials file for use with samba (the ‘system’ which handles network shares between Windows and Linux/Unix) .
For this mini tutorial about network shares, I will be using the example where you want to create a mapped network ‘drive’ to music files you’ve stored on your network server, NAS etc. But you will obviously need to replace these ‘example placeholders’ with your own actual share(s) and their purpose 🙂
Stage 1 (creating the credentials file)
- open the terminal (CTRL+ALT+T on many distros including Kubuntu and Ubuntu)
- then type: sudo nano /etc/samba/creds-nas
in this new file type:
username=yourusername
password=yourpassword
Then press CTRL+S to save the file and close nano again with CRTL+X
NOTE: This username and password needs to be the password for the (secured) network share NOT your Linux username/password (if they aren’t the same)!
If your network requires a domain or workgroup you can add a third line:
domain=DOMAIN_OR_WORKGROUP
for most users in a ‘home setup’ (and thus in most cases when you need this tutorial 😉) this isn’t needed though.
NOTE: You can name these files nearly anything you like, but do NOT use ‘strange characters’ or blank spaces in their file names to prevent possible issues later on. I would also recommend to restrict your network share names and local mount point names to not use spaces or ‘absurd characters’.
Stage 2 (‘securing the creds-nas file’)
Now run the following two commands in your terminal (replace creds-nas with your own filename if you named it differently):
sudo chmod 600 /etc/samba/creds-nas
sudo chown root:root /etc/samba/creds-nas
The first line here sets the file so that only the user root can READ and WRITE to it (other users will NOT even be able to read it without sudo’ing). The second line is officially not needed since we already created the file with sudo (meaning root will automatically be the owner). But I did included it as additional security measure just in case new users might accidentally made a mistake causing the regular user being the owner of the file (potentially exposing the file to other processes which are being executed at regular user level).
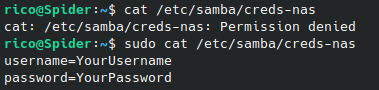
To confirm that you have set the permissions correctly you can test this by typing the following command (without using sudo):
cat /etc/samba/creds-nas
If you’ve set the permissions correctly, you should see an error like this:
cat: /etc/samba/creds-nas: Permission denied
Which means the file permissions (security) is setup correctly. If you would now type the same command again but with sudo in front of it, it should show your username and password.
Stage 3 (Making sure we can actually use the credentials file)
To make sure we can actually use the credentials files in our arguments while mounting, we’ll need to ensure that we have cifs-utils installed.
to check IF it’s installed you can run the following command in your terminal:
dpkg -l | grep cifs-utils
If you don’t get any information back, then it means it’s not installed. Installing cifs-utils can simply be done by typing the following two
commands in your terminal:
sudo apt update
sudo apt install cifs-utils
Stage 4 (Creating the local mountpoint)
Now we first need to create a local mount point to which we will be mounting/mapping the network location. I would recommend to make something like /mnt/nas/YourShareName
To make this directory/these directories you’ll need to run the following command:
sudo mkdir -p /mnt/nas/YourShareName
The -p ensures that it also created the parent directories if they don’t exist yet (in this instance the /nas directory for example).
Obviously you will need to change the YourShareName to the name of the network share (or something easy for you). So let’s for example say you are making a mount to a network folder with music in it, then you could for example do:
sudo mkdir -p /mnt/nas/Music
Stage 5 (figuring out your UserID and GroupID)
Now (in the terminal again) we’re first going to get your UserID and GroupID (UID & GID).
for the UserID we’ll use the command: id -u
for the GroupID we’ll use the command: id -g
Write down these two numbers if needed. Although for most standard Linux users (and single user systems) both these values will often be 1000.

Stage 6 (Backing up your fstab):
We’re first going to backup your fstab (just to make sure that IF you mess something up you still have a back up).
so first run this command in your terminal:
sudo cp /etc/fstab /etc/fstab.xnlbak
This will create a backup of your fstab.
But what is this fstab thing?
fstab is your File Systems Table, and it lists all the partitions, file systems and network shares which should be made accessible (mounted) when the system boots. This however also means that IF you mess up this file, that your system potentially won’t boot (properly) anymore! hence why this backup is soooo important!
NOTE: Usually you can use something like .bak or .org, or .old etc… But in my tutorials I always prefer to use something with an XNL prefix so that it’s MUCH less likely that my tutorials will overwrite possibly already existing backup files (hence the .xnlbak extension).
Stage 7 (Editing your fstab):
Now we’re going to edit your fstab to add the network share by using the following command (still in your terminal):
sudo nano /etc/fstab
NOTE: If you prefer you can instead also use something like: kate /etc/fstab to edit the file in the GUI, which might be a bit easier for absolute ‘console virgins’ 😉. You will then need to enter your password upon saving the file. TIP: If you are absolutely new to Linux, then I would actually recommend you to add one share with nano (just to familiarize yourself with it), and then add others (if you have them) with Kate or to just check the file with Kate for your own comfort 😊.
[resuming the tutorial from here on assuming you’re using nano]
When nano opened, scroll all the way down (with your cursor keys) and first create an empty line (if there isn’t one yet).
Next add the following line followed by an enter:
# Network Shares
Directly underneath that line you can now add your network share as follows (READ FURTHER FIRST! this is an example):
//ServerIP/ShareName /mnt/nas/ShareName cifs credentials=/etc/samba/creds-nas,uid=1000,gid=1000,iocharset=utf8 0 0
You need to replace the uid and gid with the correct numbers you’ve gotten from the id -u and id -g commands earlier, and you of course also
need to make sure that the path to both your network location and the local mount point are correct.
So if we would take an example where our NAS/Network Server is at IP 192.168.0.200 and the music is stored on a share called ‘NetworkMusic‘ but we want to mount/map it locally to your /mnt/nas/Music then it would look like something like this:
//192.168.0.200/NetworkMusic /mnt/nas/Music cifs credentials=/etc/samba/creds-nas,uid=1000,gid=1000,iocharset=utf8 0 0
Special characters Tip
If your network share contains (blank) spaces, then you will need to replace those with \040 in your fstab. So if the share on the network would for example be: ‘//192.168.0.200/Network Music‘ then it would become this in your fstab:
//192.168.0.200/Network\040Music /mnt/nas/Music cifs credentials=/etc/samba/creds-nas,uid=1000,gid=1000,iocharset=utf8 0 0
Once you’ve added your network share(s) just press CRTL+S to save followed by CTRL+X to exit again (if using nano).
But what if I have multiple shares but they use different credentials (usernames and passwords)??
Then you can just simply create several credential files as explained in Stage 1 and Stage 2 but with different names like for example:
creds-nas, creds-nas2 and creds-nasmusic etc.
and then use them as follows:
//192.168.0.200/ShareLocation1 /mnt/nas/Location1 cifs credentials=/etc/samba/creds-nas,uid=1000,gid=1000,iocharset=utf8 0 0
//192.168.0.200/ShareLocation2 /mnt/nas/Location2 cifs credentials=/etc/samba/creds-nas2,uid=1000,gid=1000,iocharset=utf8 0 0
//192.168.0.200/ShareLocation3 /mnt/nas/Location3 cifs credentials=/etc/samba/creds-nasmusic,uid=1000,gid=1000,iocharset=utf8 0 0
You can basically name the cred files anything you like, and I would also recommend naming them something which you can easily remember,
to ensure you later on do understand what the credential files were for 😊
NOTE: It’s NOT recommended to auto mount network shares in your fstab if you’re on a laptop, tablet or other device which doesn’t always has access to the network share(s) (OR if you’re NAS/Network Location isn’t always available to/for your system). Because this could potentially cause delays during boot, opening dolphin or things like that (more about that at the bottom of the tutorial, and how to work around that).
But what if I would want to manually mount my share (or with a script for that matter) but DO want to use the credentials file?
That’s also very well possible by just using something like this command in your terminal (or script):
sudo mount -t cifs “//192.168.0.200/Location1” /mnt/nas/Location1 -o credentials=/etc/samba/creds-nas,uid=1000,gid=1000
NOTE: Once again make sure the locations/paths, ID’s and credential file are correct for your configuration.
And how to mount without a credentials file but with username and password instead?
You can do that by using the following command in your terminal:
sudo mount -t cifs “//192.168.0.200/Location1” /mnt/nas/Location1 -o username=USER,password=PASSW,uid=1000,gid=1000
Where USER and PASSW should be replaced with your password of course.
WARNING THOUGH: Doing this will often cause the credentials to be visible in your terminal history (when pressing cursor key up/down)! So it’s NOT recommended to do this.
And how can I manually un-mount the network share?
That’s as simple as running the following command: sudo umount /mnt/nas/Location1 (where you of course need to replace /mnt/nas/Location1 with your actual local mount point for the share you want to un-mount)
I’m trying to connect to a (very) old server but am having connection issues!?
If you are having issues connecting to an very old server/device etc, you might want to try to add vers=1.0 to the options.
Example in fstab:
//192.168.0.200/MyNetworkShare /mnt/nas/MyShare cifs credentials=/etc/samba/creds-nas,uid=1000,gid=1000,iocharset=utf8,vers=1.0 0 0
Manual Mount Example:
sudo mount -t cifs “//192.168.0.200/Location1” /mnt/nas/Location1 -o username=USER,password=PASSW,uid=1000,gid=1000,vers=1.0
I however DO NOT recommend using this unless ABSOLUTELY necessary, since this uses a MUCH older and MUCH less secure protocol of samba (to keep it plain and simple).
What if I just want to use my file browser (Dolphin for example) to navigate to a network share/server?
Then you can just simply click on the ‘address/location bar’ and type: smb://ServerIP (example: smb://192.168.0.200). If the share (or server) requires a username and password, then Dolphin (when using Kubuntu/KDE) will ask for it and also give you the option to remember it in the future. On Windows you might be used to just using \\ServerIP but in Linux you will need to use it with smb://, this basically tells Linux which protocol to use when approaching the ‘url’ your are trying to use.
Extra Tip
If you are having issues when connecting to older shares (or NAS servers/devices), you could also try to add either sec=ntlm or sec=ntlmssp to the options, for example:
sudo mount -t cifs “//192.168.0.200/Location1” /mnt/nas/Location1 -o username=USER,password=PASSW,uid=1000,gid=1000,sec=ntlm
These are two different types of authentication which might be needed for older devices. Do note though that using sec=ntlm is less secure than sec=ntlmssp!
I won’t dive too much into this topic, because this tutorial is (once again) getting much longer than I initially planned 😉, but these two are some additional options you might want to give a try when you are having connection issues with older Windows machines or NAS devices.
Running on an older version of Ubuntu/Kubuntu and/or system hangs during shutdown!
If you’re running on an older version of Ubuntu or Kubuntu and your system now hangs (a while) on shutdown after you’ve added the network shares, then you might want to try to run these two commands:
sudo update-rc.d -f umountnfs.sh remove
sudo update-rc.d umountnfs.sh stop 15 0 6 .
These commands (simply put) ensure that first the file-shares (and thus also network shares) are unmounted before the network connection itself is terminated. Otherwise it is possible that the network connection is terminated before the shares could properly be disconnected/unmounted.
This is however NOT needed for most newer systems, I specifically added this for those of us who for example tinker with the older versions on our embedded devices etc and run into this problem.
File Manager Freezes On Opening Network Mount
It could happen that your file manager (I’m assuming Dolphin in my tutorial, but it can of course be a different one depending on your desktop environment, like Nemo in Cinnamon for example) freezes when you click on your mounted network share. Especially if the connection has gone ‘stale’. This can for example happen when your network has been disconnected and reconnected without properly un-mounting and remounting the network mounts again. The most simplest solution here is to open the terminal and to then just type:
pkill -9 dolphin (or of course your own file manager). This will then kill ALL instances of dolphin, so keep this in mind if you for example have something important open in it in other windows.
Reconnecting To Stale/Dead Network Mounts
If you are experiencing the problem as described above, you obviously want to remount (aka reconnect) to your network shares. Well first we’ll have to make sure the stale ones are properly unmounted for now. You can do this by running the following command in your terminal:
sudo umount -a -t cifs -l
The -a tells umount to unmount EVERYTHING in the fstab, this is also why you absolutely need to specify the second “filter” which if -t (type). With –t cifs you tell umount to ‘limit the action’ to the specific filesystem (in this case the network shares since we specified the cifs).
After running this command you’ve successfully unmounted all network shares.
TIP: You can also just run this command when you are not at home/at the office and are ‘annoyed’ by the ‘dead network mounts’ in Dolphin 😉. Without remounting them. Doing this is only active during your current desktop session, so no worries, they will automatically reconnect upon your next login at home/the office.
Reconnecting to all network shares (which are in your fstab)
To reconnect to all the network shares which you have added to your fstab you can run the following command:
sudo mount -a -t cifs
The explanation for this command (and it’s parameters) is the same as above for umount, except here it mounts instead of unmounting 😊.
You can also run sudo mount -a but that will try to (re)mount everything from your fstab (which isn’t already actively mounted when running the command). So if you for example have an USB drive which you auto mount via your fstab, but you had it unmounted manually during your current session, then it might also try to remount that one if you don’t specify the -t cifs.
Can I Make Scripts For The Mounting and Umounting?
Of course you can, and I even recommend you to do so if you have to reconnect to your network often (for example when re-locating or moving around in the office etc often during your work).
I have ‘pre-made’ two simple ‘copy-paste-scripts’ for you which you can just copy-paste into a new file and then safe as .sh file to make it a bit easier for beginner. One if intended as Disconnect/Unmount and the other as reconnect/(re)mount.
NasUnmount.sh:
#!/bin/bash
sudo umount -a -t cifs -l
NASReMount.sh
#!/bin/bash
sudo mount -a -t cifs
TIP: Don’t forget to chmod +x the sh files after creating them, otherwise they won’t run 😉
Example after saving them (in the same directory as the scripts you made): chmod +x NasUnmount.sh NASReMount.sh
(The command above will chmod both scripts at once, IF they have those exact names of course 😉).
Sometimes My Drives Don’t Mount On Login (but are visible in for example Dolphin)
This is most likely happening when you are on wifi, and the connection wasn’t fully established yet upon login. The very simple fix for this is just running sudo mount -a after logging in 😊. Yup, there are workarounds, but those can vary per distro. When on wifi I would for beginners just recommend using sudo mount -a if your network mounts haven’t mounted fully in for example Dolphin😊. (You can also make the script as mentioned above and properly use sudo mount -a -t cifs 😊.
Tutorial Updated (Last Update: 22-08-2025)
On request of some friends and colleagues whom where experiencing issues on ‘roaming devices’ like laptops and tablets, but did still wanted to use the fstab method for network shares, I decided to add the following three chapters on 22-08-2025:
– File Manager Freezes On Opening Network Mount
– Reconnecting To Stale/Dead Network Mounts
– Sometimes My Drives Don’t Mount On Login…
Final words
Please do realize that this is not meant as a full comprehensive tutorial on how to completely setup network shares, how to fully configure samba or other network things related to this. There are plenty of excellent tutorials on these topics out there with a bit of ‘duck-duck-going’ 😉. But I did noticed that at least four of our friends and/or team members ran into issues when several tutorials about making auto-mounts caused problems for them, contained outdated information or even had contradicting information in them. Which is why I made this tutorial (initially just for them as explained at the top). Please refer to other tutorials (or the official documentation for your distro) if you are having other issues related to networking, samba, creating file shares and such.
I also do want to add that it’s not ideal to store credentials in plain-text files (even when they are read only for root), but this is a common (easy) practice for mounting shares.
For now I hope that this tutorial was helpful for some of you, if so don’t hesitate to let me know in the comments bellow (you don’t need to make an account to do so btw). If I get some feedback from others that tutorials like these did indeed helped them, then I also know it is worth it to keep making small(er) tutorials like these for these things which might be simple for more experienced Linux users but might actually confuse or strand newcomers to Linux 😊.