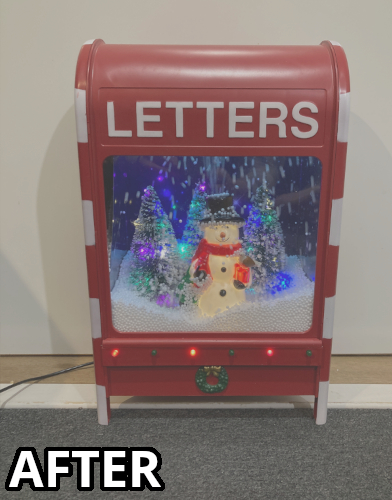

Sophie’s Christmas Snowbox Upgrade
These are the project files for the project I’ve made for our rescue pigeon Sophie, it was/is a Christmas snowbox which had VERY “power management”, boring lights, terrible music, not enough lights, and more of the alike.
So as usual, I decided to do something about it and upgrade it😂.
This download contains the source code for the microcontroller and two (different) diagrams on how I wired it up (one with microcontroller and one without).
Download: 3.46MB
By clicking on the 'I Agree & Add to download basket', you confirm that you have read and agree to the License shown at the License tab.
Information
These are the project files for the Snowbox Upgrade Hack I did for our Rescue Pigeon Sophie which you can find on my YouTube channel.
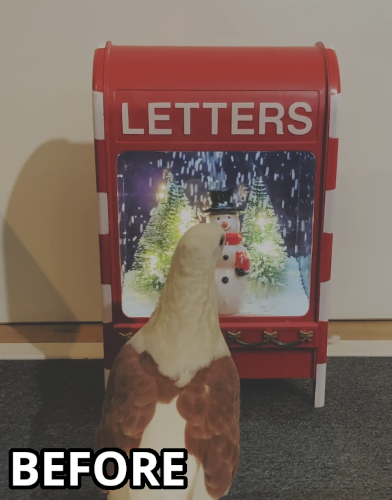
This was basically a personal project to upgrade the Christmas decoration we’ve bought for our beloved Sophie because she loved these ‘snowboxes’ so much when she saw them at a Christmas store we went to with her (can be seen in the time stamped video here), so we later on bought one which we could also put on the floor for her (shorts of her getting it here).
NOTE: Sophie ‘telling about’ her getting the upgraded snowbox can be seen in this shorts on her channel.
However, I quickly learned that it ate through it’s batteries like CRAZY! And I mean insanely fast. So from the start I already wanted to make it “AC Powered”, because it was seriously just a waste of batteries. This year I finally got to it, and decided to not just upgrade the power supply of the snowbox, but to also overhaul the lights, add more lights in general, re-do the entire ‘sound system’ and more of the alike.
Basically: (almost) just repurposing the enclosure itself😂.
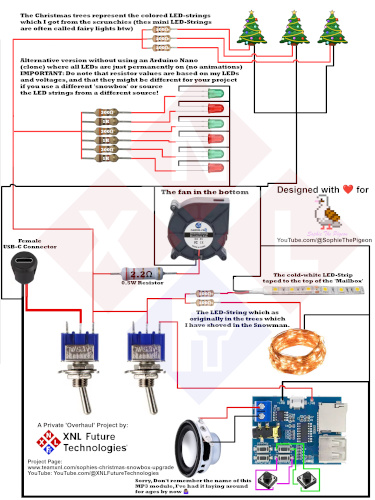
I did NOT designed any circuit boards for it, no official schematics etc, but I DID created graphical diagrams showing how I did this modification for our snowbox.
I made two diagrams: One with Arduino Nano, and one without Arduino Nano. For if you for example want to do something similar but don’t want to or can’t use the Nano (and thus just want to leave out the LED animations). I also included the source code for the Arduino Nano in the download, which is written in VSCode using PlatformIO, but I also included an Arduino IDE compatible source code.
NOTE: The Arduino IDE Compatible Project/Source has NOT been confirmed working with the Arduino IDE, but it SHOULD not be a problem since it’s a relatively simple project. I just can’t confirm it indeed works with the ArduinoIDE because I don’t use their software anymore, and neither will I install it on my computer (sorry).
I hope these project files will be useful to someone, or at least inspire someone else to make their own Christmas Decorations Modification(s)😊
Happy Holidays from me and Sophie🕊️🪶
License
License? What license? This is soooo simple, that I find it ridiculous to put any type of license on this 😉😂. If you do need to ‘label it’ with a license: Public Domain, do with it as you please. If it makes you a millionaire? GREAT! have fun😂. Would not mind to see some appreciation by signing up for my Patreon if that happens though😉? The only thing licensed/copyrighted are the diagrams and logo’s used on it. For the rest? Do with it as you please.
License
Consider this project as fully open-source, so much that I don’t even attach a license to it.
The image (Diagram included in the download) is obviously copyrighted due to the images/logo’s used, and so is the content I’ve made about this project, but the schematic or source code can be considered public domain and thus meaning you can do whatever you want with it for both private and commercial products. Just don’t be evil okay 😉👍🏽
It however comes with ABSOLUTELY NO WARRANTY, and use is 100% at your own risk (this also includes you building it). And thus I do not accept ANY liability from you using these files or replicating this project.
Bill Of Materials
Of course because this isn’t really a pre-setup or ‘designed by my’ project there isn’t just a regular bill of materials,
this also because you would obviously also need the very specific ‘Snowbox’ which I’ve modified for this project.
However, you could of course also apply my modification/upgrade to many other variations of these products.
The parts which I’ve used for my upgrade are:
– 1X Christmas Snowbox Thingy 😉😛
– 1X Arduino Nano Clone (AtMega328P)
– 3X BC547 TO-92 Transistor
– 6X 1K Resistor 1/4W
– 5X 100Ohm Resistor 1/4W
– 3X 330Ohm Resistor 1/4W
– 1X 2.2Ohm Resistor 1/2W (used to limit the fan it’s current a bit)
– 3X 5mm Red LED
– 3X 5mm Green LED
– 2X 12x12mm Tactile/Push Button (used for ‘re-routing’ two of the MP3 Module Buttons)
– 1X piece of spare proto-board (I would say about 30x15mm or so)
– 1X 30mm Speaker
– 2X 3PDT Toggle Switch (“Lever Style”)
– 1X USB-C Connector (Mountable)
– 1X Cheap TF-MP3 Module with onboard amplifier and USB + Buttons (please see the diagram in the download for reference!)
– 3X LED String salvaged from ‘blinking scrunchies’ (these strings are often called Fairy Light Strings or micro led string)
NOTE: You could also make/replicate this same project without using the Arduino Nano (clone), just make sure to use the non Arduino Diagram which is also included in the download.
Of course you can always replace parts for your own version of the project, but these are just the parts I used in my project to match my requirements. Keep in mind that this is a DIY Hack/Upgrade and thus there are no direct guidelines on how to do it.