[FIX] Touchscreen no longer working on Surface Kernel
IMPORTANT: This tutorial assumes Kubuntu, Ubuntu or an Ubuntu based distro! Since that is also what I use (Kubuntu) and what I've used in my original tutorial video! So if you're using this for a different distro, then please adapt the commands to your specific distro. But please don't ask me to help, since I (obviously) don't know each distro in-and-out, and won't pretend I am either 😉. TIP: I also have an YouTube Video about this topic/blog-post here
So, you’ve (for example) used my tutorial to install Linux on your Microsoft Surface, have been happily using it but now suddenly after using it for a while without problems your touch screen “randomly” stopped working😳?
Well that’s not that random though. Because fairly recently (around April) Linux kernel 7.0 came out. And while that might not seem like a big deal (and even a good thing), it can be a problem when you’re on a custom kernel like with the surface kernel.
Simple explanation what happens
Let’s say you’re currently on Surface kernel 6.19, and then the base of your distro (Kubuntu/Ubuntu in my case) delivers the newer 7.0 Linux Generic Kernel via an update…
grub (the boot loader/menu for many distro’s) then thinks: “HEY! There is a NEWER kernel version installed (the Generic 7.0), and the user is on an older one (which is actually the one you need! and thus the surface kernel!): I need to make sure the user auto boots with the newer kernel instead!”
Which is usually indeed what you do want to happen to ensure your system has the latest kernel version for the latest hardware support, security fixes etc. However, due to the ridiculous nature of the Microsoft Surfaces (where Microslop decided to use custom proprietary hardware for stupid simple common sh*t like, touch panels, cameras etc), we actually rely on the custom (‘older’) kernel until that one gets ‘in sync’ with the main 7.0 kernel (often called mainline/upstream btw). So due to this we DO NOT want grub to auto select the latest generic kernel when the main distro ships it with an update. Heck (in my opinion) we don’t even need/nor want the main line kernel at all on the surface until it supports the things we need (like touch screen etc) out of the box (which is also when we don’t need the surface kernel anymore for your device).
Can’t I just uninstall the latest generic kernel so that it will use the Surface Kernel again?
Yes, and….. no. If you JUST uninstall it, then the next version (minor version bump) will auto-download it again with updates and (re-)activate it as the main kernel to boot with (and thus leaving you without a touch screen etc).
Can’t I just set the Surface kernel as ‘the selected option’ by manually editing the grub config files?
Whoa… yeah you are most likely already in the territory of not needing my tutorials/blog-posts 😉, but I will cover it anyway. Yes you could indeed do that. But I have had several surfaces which still did switched to the generic again when 7.0.0.28 got released for Ubuntu/Kubuntu, making me re-set it again.
What can be done then?
Well in my personal opinion, 95% of the users who are using Linux on their surface, do NOT need the generic kernel at all. They just want to use their surface for what it is: A laptop/tablet/PC (if you have a dock) hybrid with a working touchscreen. So the majority of those also don’t ever need the generic kernel install at all. This solution will explain how to uninstall the generic kernel and then also block it from ‘auto installing’ ever again. And thus also prevent you from having to go through “all” the steps you’re about to do. And I’ve “quoted” all, because it’s not that big of an deal if you just follow this tutorial, so no worries😊.
How to fix your touchscreen after an update ‘broke’ it
Again (just to make sure!): This tutorial/post is assuming you're running Kubuntu, Ubuntu or an Ubuntu based distro!First we’re going to find out which kernel you’re currently running on, by running uname -r in the terminal, and then we should like to see something like: 6.19.8-surface-3 (note the surface in there).
But you will most likely see something like: 7.0.0-28-generic (note the generic).
This means that you are currently NOT running (booted into) the Surface Kernel, but into the general kernel. And that is what is the reason your touchscreen has stopped working. To fix this, we’ll first have to boot into the surface kernel now.
Booting into the Surface Kernel
First turn off your surface and then turn it back on and ‘keep bashing’ the escape button until you are in the grub (boot) menu. No worries if you suddenly end-up at some “half baked command line” which you have never seen before, it just means that you have pressed escape “one time too many”.
But,…. but.. You said keep bashing🤬!
YES! I know! But the Surfaces (at least several models I have), have an RIDICULOUSLY bad/low response time during the ‘UEFI Boot Section’ and the Type Cover, together with the fact of the ‘wannabee on screen keyboard’ it tries to present in the bottom right corner, makes it nearly impossible to get into it ‘the normal way’ 🤦🏾♀️ ,Yay, thanks Microslop!
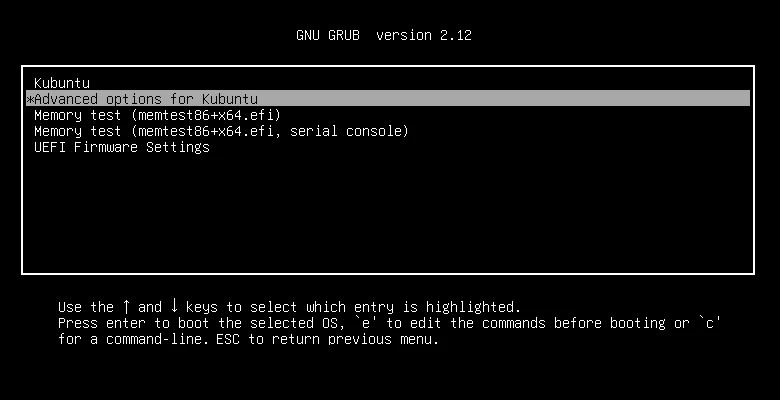
So now that you are in that ‘terminal thing’, just type: normal followed by enter and right after pressing enter, press esc/escape ONCE…. You will now be in the grub menu if everything went okay😊.
(Just assuming Kubuntu for now!)
You should now have a menu like shown on the left here. There you’ll choose
Advanced options for Kubuntu
A following menu will (should) open with several kernel options, both normal and ending in (recovery). You DO NOT need the recovery mode, what you however do need to select is the latest installed surface kernel for your surface. At the time of writing this, this would be on my SP7 be:
Kubuntu, with Linux 6.19.8-surface-3
Select the latest one and then press enter to boot your Linux with it.
But I don’t have any -surface- kernel options in my Advanced options menu in grub!
Then something has gone wrong elsewhere already, or you haven’t installed it (yet). I would then recommend checking my video about installing Linux on a Microsoft Surface and check how to install the surface kernel (the link here is already time-stamped to start at the section you need).
Booted with the Surface Kernel Active

(Once you’ve booted with the Surface kernel, we’re first again going to confirm you are currently actually running on the surface kernel by typing uname -r again.
And as you can see in my (cropped) screenshot, it is now showing -surface- as part of the current kernel. So that means we’re now running Kubuntu with the Surface kernel active, and thus also that the touch screen should work at the moment.
Checking which kernels are installed
Now we’ll need to check which kernels are (all) installed, to do this we’re going to run the following command:
dpkg –list | grep -E “linux-image|linux-headers”
When I do this on my Surface Pro 7, running Kubuntu 24.04, I get the following list:
linux–headers–6.14.0–37–generic
linux–headers–6.15.1–surface–2 –2 on amd64
linux–headers–6.16.9–surface–1 –1 on amd64
linux–headers–6.17.0–35–generic
linux–headers–6.17.1–surface–2 –2 on amd64
linux–headers–6.18.3–surface–2 –2 on amd64
linux–headers–6.18.7–surface–1 –1 on amd64
linux–headers–6.19.8–surface–3 –3 on amd64
linux–headers–6.8.0–136 rsion 6.8.0
linux–headers–6.8.0–136–genericon 64 bit x86 SMP
linux–headers–7.0.0–28–generic
linux–headers–generic
linux–headers–generic–hwe–24.04
linux–headers–surface
linux–image–6.11.0–17–generic
linux–image–6.14.0–28–generic
linux–image–6.14.0–29–generic
linux–image–6.14.0–32–generic
linux–image–6.14.0–33–generic
linux–image–6.14.0–35–generic
linux–image–6.14.0–36–generic
linux–image–6.14.0–37–generic
linux–image–6.15.1–surface–2
linux–image–6.16.9–surface–1
linux–image–6.17.0–14–generic
linux–image–6.17.0–20–generic
linux–image–6.17.0–23–generic
linux–image–6.17.0–35–generic
linux–image–6.17.1–surface–2
linux–image–6.18.3–surface–2
linux–image–6.18.7–surface–1
linux–image–6.19.8–surface–3
linux–image–6.8.0–136–generic
linux–image–7.0.0–28–generic
linux–image–generic
linux–image–generic–hwe–24.04
linux–image–surface
In my list you might notice a whole bunch of generic kernels, as well as a whole bunch of Surface kernels. On your machine that list most likely (significantly) shorter though (I tend too keep multiple kernels on my machines for development purposes).
The only thing you should now ‘worry’ about is finding the latest one which has -surface- in it, and that would in my example be:
linux-image-6.19.8-surface-3. Next you’ll need to find the generic one(s) which have a HIGHER version number than your latest surface kernel, in my example that currently would be: linux-image-7.0.0-28-generic.
NOTE: If you’re reading this further ahead in the future, then it MIGHT happen that you have multiple generic version which are newer than the latest surface kernel on your system. For example: linux-image-7.0.0-28-generic, linux-image-7.0.0-30-generic, linux-image-7.0.1-10-generic. IF that is the case then those ALL need to go (in the following step).
|
Advertisement blocked due to cookie settings.
Please consider reading our AdSense Information page to learn why we use advertisments on our website, how you can enable them, or how you can even get rid of this 'red box' by becoming a Patreon (any tier). The AdSense Information page also explains that and how we are telling Google/AdSense to only show non personalized / non tracking advertisements. |
Removing the generic kernel(s)
So now that we’ve “booted into the Surface kernel”, and we have the list of kernel(s) to remove (the dpkg –list…. command), we will now proceed to remove all those (newer than the latest Surface kernel) kernels.
IMPORTANT: In my example here I'm using the latest generic version as of writing this, you will need to make sure that the kernel(s) match what is actually installed on your system AND is newer than your latest installed surface kernel.Note that in my dpkg –list earlier, we’ve also noticed: linux-image-generic-hwe-24.04 and linux-headers-generic-hwe-24.04 (which could also be 26.04 if you’re running Kubuntu 26.04, or another version higher or lower for that matter). Those ALSO will need to go, to prevent possible issues later on. Because if you would look at the second column next to it (on your own output, I didn’t included the whole output in my previous list) then it will most likely look something like this:
i linux-image-generic-hwe-24.04 7.0.0-28.28~24.04.1……
Again, note the 7.0.0 there. That could yet again cause some issues when auto updating via either discover or when manually doing apt update apt upgrade later on (emphasis on COULD!).
So we will like said, ditch all the kernel files newer than the latest surface kernel installed, and we will be doing so with the following command (in my example/output!):
sudo apt purge linux-generic linux-image-7.0.0-28-generic linux-headers-7.0.0-28-generic linux-image-generic-hwe-24.04 linux-headers-generic-hwe-24.04
Keep in mind: The entire line above, which is in bold, is one single command, it’s just ‘clipped’ into multiple lines on the website due to it’s length!
IMPORTANT: I would recommend to write down or remember the hwe version which you removed earlier from your system so you can install the correct one again when/IF needed! For kubuntu 26.04 that would for example be linux-image-generic-hwe-26.04 etc
The system will now ask you to confirm if you want to remove then so reply with Yes.
Preventing the generic kernels from being re-installed/updated again later on
If we would not reboot, then we are back into the Surface kernel automatically, HOWEVER! If apt or discover would later on see a newer version of the kernel (the generic one!), then it will just happily (re)install it again. And we want to prevent that.
We can create a simple file to tell APT (the package manager of Kubuntu/Ubuntu etc) that we don’t want it to install certain packages, and treat them as ‘non-existing’, so even IF you would try to install them manually or another program would try to, then APT will simply refuse because it “thinks” that they don’t exist due to that file.
I will explain both ways so you can pick the one which you prefer, manually creating the file, and a single ‘copy-paste-command’ for in the terminal if you’re in a hurry, just want to get it running now, or don’t care about learning ‘terminal administrator stuff’ for now😉😊.
The Manual Way
Open a terminal (if you don’t have one open yet) and type:
sudo nano /etc/apt/preferences.d/xnl-block-generic-kernel
TIP: The xnl- prefix is just what I use personally so I can quickly see in/between system files what I’ve added, edited, modified etc, you could also use your own prefix, or keep this one so you can easily find the tutorial again if stumble upon the file randomly (forgotten what it does).
Nano (the terminal text editor should now have opened with a blank file (which will automatically be created upon saving and exiting).
Now type (or copy-paste) the following lines in nano:
Package: linux-generic linux-image-generic linux-headers-generic linux-image-*-generic linux-headers-*-generic
Pin: release *
Pin-Priority: -1
For ‘clean system file practices’ I personally always make sure there is another blank line (enter) after the last line. When you’ve typed/copied this into nano, press ctrl+s to save the file, and then ctrl+x to exit nano again.
What do these lines mean
The Package: line tells which packages are affected by this ‘config file’
the Pin: line tells it affects releases and ALL sources (due to the wildcard *) it could come from (NOTE: This does NOT affect the surface kernel!)
the Pin-Priority: line is set to -1, basically setting it to NO/”incorrect” Priority, meaning that we’re telling APT that it should NEVER install or auto upgrade to these packages/versions
The One-Command-Copy-paste Way
You could also (NOT needed if you already did the manual way!) just open a terminal (if you didn’t had one open yet) and paste this entire block in it and then press enter (the text in bold):
sudo tee /etc/apt/preferences.d/xnl-block-generic-kernel << 'EOF'
Package: linux-generic linux-image-generic linux-headers-generic linux-image-*-generic linux-headers-*-generic
Pin: release *
Pin-Priority: -1
EOF
This will then automatically create the “blocking file” for APT to block the generic kernel(s).
Checking if APT picked up your new rule(s)
If you like you could now double-check/confirm if APT has picked up the new rule by typing the following command:
apt-cache policy linux-generic
You should now get an output which looks something like this:
linux-generic:
Installed: 6.8.0-136.136
Candidate: (none)
Version table:
*** 6.8.0-136.136 -1
500 http://nl.archive.ubuntu.com/ubuntu noble-updates/main amd64 Packages
500 http://security.ubuntu.com/ubuntu noble-security/main amd64 Packages
100 /var/lib/dpkg/status
6.8.0-31.31 -1
500 http://nl.archive.ubuntu.com/ubuntu noble/main amd64 Packages
NOTE: The Installed might also show something like none, or anything else, depending on IF your system still has (OLDER!) generic kernels installed (like mine does as you can see above).
The most important line however is: Candidate: (none). The fact it shows none here means that APT doesn’t see any valid (new) candidates to install. And thus that your block has taken effect now.
Updating Grub once more
Just for good measure (although the removal of the generic kernels should already have covered it, I just want to run it again to make sure) we now run sudo update-grub
And depending on how many remaining kernels you have left on your system, the list will be longer or shorter than mine, but it would/should look something like this:
Sourcing file `/etc/default/grub’
Generating grub configuration file …
Found linux image: /boot/vmlinuz-6.19.8-surface-3
Found initrd image: /boot/initrd.img-6.19.8-surface-3
Found linux image: /boot/vmlinuz-6.18.7-surface-1
Found initrd image: /boot/initrd.img-6.18.7-surface-1
Found linux image: /boot/vmlinuz-6.18.3-surface-2
Found initrd image: /boot/initrd.img-6.18.3-surface-2
Found linux image: /boot/vmlinuz-6.17.1-surface-2
Found initrd image: /boot/initrd.img-6.17.1-surface-2
Found linux image: /boot/vmlinuz-6.17.0-35-generic
Found initrd image: /boot/initrd.img-6.17.0-35-generic
Found linux image: /boot/vmlinuz-6.16.9-surface-1
Found initrd image: /boot/initrd.img-6.16.9-surface-1
Found linux image: /boot/vmlinuz-6.15.1-surface-2
Found initrd image: /boot/initrd.img-6.15.1-surface-2
Found linux image: /boot/vmlinuz-6.14.0-37-generic
Found initrd image: /boot/initrd.img-6.14.0-37-generic
Found linux image: /boot/vmlinuz-6.8.0-136-generic
Found initrd image: /boot/initrd.img-6.8.0-136-generic
Found memtest86+ 64bit EFI image: /boot/memtest86+x64.efi
Warning: os-prober will not be executed to detect other bootable partitions.
Systems on them will not be added to the GRUB boot configuration.
Check GRUB_DISABLE_OS_PROBER documentation entry.
Adding boot menu entry for UEFI Firmware Settings …
done
In the list outputted by the update-grub command, we should now no longer see the 7.0…. kernel, and the surface kernel should be the one with the highest version number of all other kernels (if any).
IMPORTANT TIP:
I personally STRONGLY recommend to NOT remove all older versions of the Surface kernel with the thought of “Ow well I’m not using the previous versions anymore anyway! So let’s ditch them for some extra storage space!”
That is honestly (again: in my opinion) one of the worst mistakes one can make when running on Linux! Because while chances that a newer version/update will actually break are low, it’s (like well known internet meme) never zero! So if you then just installed the latest kernel and removed all others to save some space and your system won’t boot anymore due to an issue with the kernel and your device, then you are simply put screwed. You CAN still get out of that situation without reinstalling, but I will be very honest!: IF you needed this tutorial to “fix” the Surface Kernel vs Generic Kernel boss battle, then such a recovery is not really on the horizon to be honest 😉. My personal recommendation is to AT LEAST always keep one to two previous versions of known (working well) kernels on your system. IF (in a rare instance) then something goes wrong, you can simply select the previous kernel in grub and get back into your system like nothing happened😊.
Ow, and don’t worry about that ‘extra space you’re freeing’. It will be at most be a couple hundred MB (unless you’re an kernel hoarder like me (DON’T ask me to run the dpkg –list…. on my dev pc 😂).
Small side note for ‘the Linux Neck beard Gang’😉
YES, I AM aware that there are several other methods of selecting the preferred kernel to boot with, including (but not limited to) editing grub config files for example. However, I just wanted to deliver a ‘one-method-solution’ which is guaranteed to be effective for basically every skill level of Linux users on the Microsoft Surface. And this method will work properly for all Surfaces since they will need the Surface Kernel anyway. And those who do really need multiple kernels (including the generic) to be/remain installed, will very likely already know how to handle this properly for their specific use case😉.
POSSBILE Future Problem (Distro Upgrading)
This is something you can ignore for now, but will most likely (DEFINITELY 😂) be an issue when you want to run something like do-release-upgrade / do-release-upgrade -d in the future. This for two reasons:
Reason 1: You’re (currently) running on the Surface Kernel, and basically put: doing an distro upgrade (for example from Kubuntu 24.04 to Kubuntu 26.04) is IMPOSSIBLE when you’ve booted with the surface kernel.
Reason 2: You aren’t able to run the distro-upgrade due to the fact the generic kernel is missing and neither do you have a way to boot into it or even install it (due to it being blocked in APT) so even IF you would manually try to type:
sudo apt install linux-image-7.0.0-28-generic
You would get something like:
Reading package lists… Done
Building dependency tree… Done
Reading state information… Done
Package linux-image-7.0.0-28-generic is not available, but is referred to by another package.
This may mean that the package is missing, has been obsoleted, or
is only available from another source
E: Package ‘linux-image-7.0.0-28-generic’ has no installation candidate
Because you’ve blocked it with the config file we’ve created earlier. So lets say we’re a couple months/years further and you either want to start using the generic kernel or want to distro upgrade, then you should do the following (in a terminal):
sudo rm /etc/apt/preferences.d/xnl-block-generic-kernel
(NOTE: If you’ve changed the prefix, then make sure it matches with how you named the file!)
Then followed by (we’re just installing these versions now and let APT handle the update to the latest ones when needed! This to keep the tutorial as simple as possible):
sudo apt install linux-image-7.0.0-28-generic linux-headers-7.0.0-28-generic linux-image-generic-hwe-24.04 linux-headers-generic-hwe-24.04
IMPORTANT: Like mentioned earlier, the hwe version depends on the version which you have removed earlier. On Kubuntu 26.04 those hwe lines would for example (USUALLY!) contain 26.04 (for example: linux-image-generic-hwe-26.04).
Once you’ve ran the command above (and thus (re)installed the generic kernels), then run sudo apt update followed by sudo apt upgrade.
Then just for ‘clean measure’ (not really needed, but I like the double confirmation!) run sudo update-grub once more.
You should now again see the newer kernel(s) in the list.
You can now reboot the system and it should automatically reboot into the newer generic kernel. HOWEVER! If by them the surface kernel in your LTS release is ahead again (like happened with Kubuntu/Ubuntu 24.04 LTS for example), then it will still boot into a surface kernel, meaning you still can’t run the distro upgrade command. So in that case you just go through the grub advanced options again, and select the (latest) installed generic kernel. After which it will boot into the generic kernel, and you can run do-release-upgrade.
!CRITICAL!
When doing an distro (release) upgrade ALWAYS make backups of your important data (and config) beforehand, and especially with devices which need a custom kernel (like the Surfaces): Make sure to check the latest documentation online to see IF the device is currently fully supported in the latest distro and kernel!
For example, when distro/release upgrading from Kubuntu 24.04 LTS to Kubuntu 26.04 LTS on the Pro 7 (or any other at the moment of writing this!) you WILL CURRENTLY NEED TO uninstall the Surface Wacom driver otherwise the upgrade can’t continue, or worse: IF it does for some magical reason continue, your system becomes unusable due to a bug. So you would then need to purge all libwacom*surface* modules.
I hope this tutorial was useful to you, and if so: Happy Linuxing Again😊👍🏾