Installing ArkOS/dArkOS (R36S & R36H) – ‘Pro/Short Tutorial’

Please note that this is the ‘Pro Version‘ of the ArkOS installation tutorial for the R36S and R36H, this tutorial is only intended for people who know what they are doing, which files they need, and how to perform these actions.
If you are new to flashing ArkOS to your R36S/R36H, then please use the Full Tutorial I’ve written, which you can find here. That tutorial is very extensive and explains every step in great detail even with animated screenshots where needed.
This tutorial should not really be considered as a ‘tutorial’ but more as a checklist/refresher/file reference.
This tutorial should really only be used if:
– You’re 100% certain that you have a real R36S/R36H (and not a clone)
– You know that you should NOT use the original SD-Card which came with your R36S/H and why not
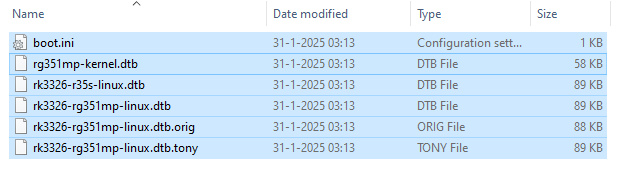
– You know which bootfiles (dtb’s) you’ll need
– You know what you need to back-up (and how)
– You know how to (re-)partition the SD-Card
– You know which ArkOS version you’ll need
Required Downloads
The required downloads and software can be found here:
ArkOS Download: Official ArkOS (use RG351MP) or ArkOS Community Maintained Version
dArkOS Download: https://github.com/christianhaitian/dArkOS/releases (more instruction below!)
Panel (DTB) Files: Original Screen.zip Screen V1.zip, Screen V2.zip, Screen V3.zip, Screen V4.zip or Screen V4 (60hz).zip
DiskImageTool: Win32DiskImager
[Optional] 7-Zip: 7-Zip
[dArkOS Additional Instructions]
ArkOS suddenly seems no longer being mainted (I WILL just keep using it myself though, until I have my own distro ready), so if you would like to switch over to the new (Linux Debian based instead of Linux Ubuntu based) dArkOS, then you will need to head over to:
https://github.com/christianhaitian/dArkOS/releases and then selected TWO files to download starting with: dArkOS_RG351MP_
Currently these are:
dArkOS_RG351MP_trixie_01142026.img.7z.001
dArkOS_RG351MP_trixie_01142026.img.7z.002
But these version numbers/names (01142026) will change in the future, just focus on the first part (since that is what you will need for the R36 units 😊, and make sure to download both files!
Panel Download/DTB files
If you are not sure (anymore) which display panel your R36S/R36H has, then you can use AeolusUX’s tool here to check this with the (original) boot file(s) from your SD-Card. If your file doesn’t get recognized then just try each version one -by-one after flashing the SD-Card until you get a working display again.
NOTE:
Most of my releases will (should) work on the Community Version of ArkOS, some releases are not supported on the community version and will refuse to run (to prevent conflicts with that version). And although most of my releases should work on the Community Version, I only officially support the Official ArkOS release.
|
Advertisement blocked due to cookie settings.
Please consider reading our AdSense Information page to learn why we use advertisments on our website, how you can enable them, or how you can even get rid of this 'red box' by becoming a Patreon (any tier). The AdSense Information page also explains that and how we are telling Google/AdSense to only show non personalized / non tracking advertisements. |
Preparing the SD-Card
DON’T FORGET TO BACK UP
Make sure that you don’t forget to back up stuff you want to keep from the SD-Card (from either the BOOT partition or the EASYROMS partition).
Before flashing the SD-Card I would personally recommend to make sure that the SD-Card consists out of one solid partition (and for example not still contain three partitions from a previous ArkOS installation). Officially Win32 Disk Imager should just erase existing partitions when writing the image to the SD-Card, but I (and a few of my test team) have had an issue using this method a few times. So to prevent possible failed image flashes I would recommend to just remove the partitions using Disk Management (just use Windows Key+R and enter diskmgmt.msc for a quick jump into the Disk Management Tool) and then create one sold partition with a drive letter assigned to it so you can use that letter to select the SD-Card in Win32 Disk Imager.
Flashing the image
Reminder: Make sure that you extract the downloaded ArkOS archive before you try to flash it 😉, I would recommend using 7-Zip to extract the .xz archive.
Now use Win32 Disk Imager, select/open the the ArkOS .img you’ve extracted (1.), select the correct drive letter for your SD-Card (2.) and click write (3.), followed by yes to confirm that you are sure that you want to write to this drive.

NOTE: Make sure that you have selected the correct drive, selecting the wrong drive (for example other connected USB drives) will destroy the data on them!
Wait until the flashing process has finished and then move on to the next step.
Copying The Correct Bootfiles
To ensure that your display still works after you’ve (re-)flashed ArkOS to your SD-Card, you will need to copy the correct files from the Display Vx.zip which belongs to your device to the boot partition of your SD-Card. Just replace the files on the SD-Card with the ones from the zip file.
dArkOS WARNING: DO NOT copy back the boot.ini! On ArkOS you DO still copy it, but do NOT do so for dArkOS (the partition information in the ini file is different and might/will prevent it from booting otherwise!)
Initial boot
And now you’re basically done to get going again😊. If you accidentally used the incorrect display files, then don’t worry, try one of the others until you find the one which will work and give you a working display again.
All done
And if everything went alright, you should now have a freshly installed ArkOS on your R36S/R36H again😊. If you did however encountered any issues, or can’t figure out one of these steps, then please check the extended tutorial here. Ow and of course don’t forget to copy you games, programs and savegames (back) onto your SD-Card 😉
Thank you for your time
If you want to support my tutorials, work, releases and other content, then please consider checking out and subscribing to my YouTube. Do note though, that my YouTube is not only about these retro consoles, and that it’s not even the main topic(s) on my channel. The main topics on this channel are 3D printing, DIY projects, hacks, mods, programming, 3D modeling and all kinds of things like that😊. So if you would only be interested in these consoles, then subscribing might honestly not be recommended for you though😊.
Happy Gaming😊
TIP: You can find my entire collection of projects, information and more of the alike regarding the R36 (and ArkOS) on my R36S (and R36H) ArkOS Central Page