Installing or Updating ArkOS/dArkOS (R36S & R36H)

UPDATE 17-01-2026 (dArkOS):
I’ve added some basic instructions for dArkOS installations, which is mostly the same except for the download which is now a different location and a two part archive. I have BRIEFLY confirmed that it’s working, but personally will remain on ArkOS and build my own (personal?) Ubuntu LTS distro for the R36 units from here on. So I have not ‘deeply tested’ dArkOS and thus can’t give additional help about it sorry.
Much shorter ‘Pro-version’ of this tutorial
Please note that there is also a much shorter ‘pro-version’ of this tutorial which you can find here, BUT please do note that that tutorial is only intended for people who already know what they are doing, which files they need (and why) etc. Please DO NOT use that tutorial if you’re new to flashing ArkOS to your SD-Card!
Video Version Of This Tutorial
I’ve now also created and published a detailed step-by-step YouTube video of this written tutorial which you can follow along if you prefer a video instead of this large chunk of text😉. The Video Tutorial can be found here.
Other Devices Info/Warning
Most of this guide can most likely also be used for many of the other (ArkOS capable) retro consoles, just make sure that you DO NOT use the image files (or additional R36S/R36H add-ons/files I mention in this post) which are intended for the R36S/R36H if you’re using this tutorial for a different device! However, I do not support any other device than the R36S/R36H in regards to this tutorial.
Tutorial Length
This might seem like quite a long tutorial tutorial for some people, and I did even spend a few days on it to prepare and ‘pre-setup’ everything to ensure that this tutorial is a smooth as possible. The reason that this tutorial might seem a bit long for some people is that I wanted to make sure that everything (well as much as possible) was covered by it. I’ve had a few less ‘tech-savvy’ testers and friends which ran into issues due to several contradicting and incomplete tutorials online, and I just wanted to make sure others would not have those issues (anymore).
Personal Intro
I’m using these Linux based ‘Retro Handheld Consoles’ mainly for testing my own (RPG) games on a console-like-system, but also to once in a while play the games I’ve dumped from my own cartridges (so I don’t have to use the original consoles anymore, and thus not risking that something happens to them). These retro consoles are often purchased by people who want to play ROMs from consoles like the Gameboy, Gameboy Color, Gameboy Advanced, NES, SNES, Playstation Portable etc.
Believe it or not but I personally don’t use it to play illegal ROMs, I did actually dumped/copied all the games I originally own to ‘digitize/backup’ my own games archive. But like said, my main use for these consoles is testing (and using) my own games and/or software on them.
Disclaimer: I/we do not condone the use of illegal ROMs, rom-packs, or any other type of illegal/pirated games/downloads, and neither do we support or promote it in any way!
Elaborate/Cumbersome Method(s) (for more experienced users only, beginners can skip this section)
Some more advanced/experienced users might notice that I here and there used ‘extended techniques’ (or cumbersome if you like), for certain steps. One example of this would be for example that I explain uses step by step how they can (“should”) remove all pre-existing partitions on the SD-Card manually, instead of just telling them to use Win32 Disk Imager to flash the image without doing this first. So yes, I’m aware that Win32 Disk Imager is capable of flashing images without first manually removing the partitions. The reason why I’ve done this is very simple, I’ve had a few testers who’ve helped me which complained that the flashing process every now and then just randomly failed halfway if they used this method. And at first I thought that they where just messing something up, until it later on also happened a few times with the cards I was working on. So to ensure that beginners have an optimal ‘issue free’ experience as much as possible, I’ve decided to take the ‘long route’ instead of taking a shortcut where they might encounter an issue.
The more tech-savvy users among us might encounter also some other ‘longer route moves’ in this tutorial, but I just want to ensure that everything is documented as clearly as possible for every level of user😊.
Thinking to buy an R36S / R36H?
If you haven’t gotten an R36S or R36H yet (which you really should! they are AWESOME!😉), then I can definitely recommend the BOYHOM store on AliExpress (non-sponsored!), I have by now bought 8 different units from them (all R36S’s or R36H’s) and ALL of them are perfectly fine, good quality and I haven’t had a single issue with any of them😊. However do be aware that there are quite a lot of fakes/clones of the R36S, which I will briefly explain in the next section. You DO NOT want to get a clone, because they are really not worth the money.
If you are still doing some research to get an R36S / R36H, then I would like to give you one very important tip:
Just get the one with the lowest possible storage space! DO NOT get the ones which for example come with an 128GB SD card etc. The cards which come with these devices are just absolute garbage, unreliable and a failure waiting to happen. Just save yourself the extra few bucks and instead just buy a decent SD Card for your console (locally!). I will also get back to this shortly though 😊
Which one would you recommend, the R36S (vertical model) or the R36H (horizontal model)?
That is totally up to you and the type of games you are planning to play on it, and for example what kind of retro/nostalgic feel you hope to achieve with it. If you mainly want to play old Nintendo games, gameboy games and that kind of stuff? And you want to (re)live the “90’s gameboy feeling“? Then you should definitely go for the R36S. Playing my (own dumped) old gameboy color Pokémon games on the R36S just feels much more authentic due to the grip and device model.
If you however would like a more modern feel, or you also want to play more ‘modern’ games on it which use the analog sticks like Playstation 1 games, PSP titles or even PC ports like Grand Theft Auto III or Grand Theft Auto Vice City (YES! These devices run those games😂!), then I would personally recommend the R36H. For performance there is no difference in both models, but the placement of the analog sticks, the L1, L2, R1 and R2 ‘bumpers’ are (again in my personal opinion) MUCH better for that type of gameplay. The ergonomics are just MUCH better with the R36H if you’re (mainly) using it for those type of games. And if you have a ‘few bucks to spare’? Just get them both, they aren’t that expensive 😊.
But it you are like me, and want to add (hardware) modifications to it, then I DEFINITELY recommend to go for the R36H instead if you are only getting one of them. The R36H has A LOT more room inside the enclosure to add ‘extra stuff’, and also quite a lot of easily accessible test and solder pads ‘to mess with’😉. I however won’t go too much into detail for that topic in this tutorial, because that’s content for another post (couple of posts actually) and a few future YouTube video’s 😊.
Fake R36 Clones Warning!
Yeah, indeed, they cloned a cloned clone device🤷🏽♀️😂. But without joking, the R36S and R36H are actually quite powerful and good devices, especially if you consider their price. And because the R36S and R36H doing quite well in sales, this also caused lower quality versions of the R36S to appear (I haven’t seen any R36H clones yet, but I think you should be expecting them soon). These clones however are often very problematic, they have all kinds of issues (from small to serious stuff). Aside from “just” performance issues, lots of them also have serious issues when trying to install ArkOS on them. Therefor I would strongly recommend you to make sure you have a real R36S or R36H before trying to install ArkOS on it. Unfortunately I can’t give you any tips on spotting (possible) fake R36H units yet, because I haven’t spotted or heard about them myself yet, but I can provide you a link to a very good page with LOTS of information to distinguish the fakes from the real deal:
https://handhelds.miraheze.org/wiki/R36S_Clones
Please beware: My tutorial does not support the clone/fake R36S or R36H models! Simply because I (luckily!) don’t have any clones, and thus I will not be able to write a tutorial which I can actually vouch for. I would then have to resort to (and repeat) information others have posted without being able to confirm it’s actually correct. And that is something I just refuse to do. Not only because I can’t confirm it works (or not), but also because I have already seen quite a lot of incorrect information and/or tips about the R36S/R36H, so I know that there is quite a ‘high risk’ that I just would be ‘re-posting’ incorrect information if I would do so.
So if you have a fake/clone R36S/R36H, then please do NOT use my tutorial, and if you do, then do realize that it is 100% at your own risk and that I do not ‘support’ the fakes/clones at all.
Get a Decent SD-Card brand (NO AliExpress, Ebay stuff etc!)
If you want to ensure stable operation, minimal risk of data corruption and ensure maximum compatibility with your R36S or R36H, it is HIGHLY recommended to only use high quality brand name SD Cards which you purchase locally (and thus NOT via AliExpress, Ebay etc where they possible come from China with a fake branding on them!). You will need to ditch the SD-Card(s) which came with the device (which I will explain in the following chapter), so please make sure you get a decent one in return.
I personally can recommend the Samsung EVO Plus cards (white cards with the size printed on them in blue), which is btw quite something for someone who usually really dislikes Samsung products in general 😂. I’ve been using the 64GB, 128GB, 256GB and the 512GB of this series for quite a while now with these devices without ANY issues. The following cards have been reported by the community to function without any issues: Samsung EVO Plus, Samsung EVO Select, Samsung Pro Endurance, Samsung Pro Plus, PNY Elite Class 10, PNY Premiere – X Class 10, ADATA Premiere U1 V10 A1.
AeolusUX, who maintains the Community Version of ArkOS (later more about this), also has a list online where you can see which cards are confirmed to work and which one have been reported to be problematic: https://docs.google.com/spreadsheets/u/0/d/1gWxtr-GmwWop-_qGUq022RXxK2aTLpPg9Qra68TQLI8/htmlview#. Personally I would recommend to just stick to the Samsung EVO cards, they aren’t that expensive and have perfect performance in these devices.
What You’ll Need for this Tutorial
- A Real R36S or R36H (the steps are exactly the same for both)
- A Good quality SD-Card to flash ArkOS onto and to put your roms on (again: DO NOT use the original one!)
- An SD-Card reader and possibly an MicroSD to SD Card adapter if your Card-reader doesn’t support MicroSD cards
- You’ll need to download some files (which we will get to later on)
- Some spare storage space on your pc (depending on how much you need/want to back up, this can add quite up though!)
- Attention (as in pay attention to the article), to ensure everything goes smoothly😊
1. First things first (backing up the original SD-Card and replacing it)
First thing you want to do when you have received your R36S (on the right in the photo above) or R36H (on the left in the photo above) is:
GETTING RID OF THE ORIGINAL SD CARD!
And no, I don’t mean it as in: get rid of the evidence because mobsters or the FBI are after you😂 (well maybe you should though, considering all the illegal crap that’s on the original cards😂).
But we will need to backup the original card to your computer (because you might need some files from it later). We will however NOT be using this card for your new installation. The cards which come with these devices (and many other retro consoles from websites like AliExpress for that matter) are highly unreliable! They are just ticking time-bombs! It’s not a matter if they will fail, but when they will fail!
I by now have about eight of these devices (2x R36S and 6x R36H) for development and testing purposes, and from the eight SD-Cards I have which came with the devices, three of them have already corrupted themselves of which one of them even completely died beyond being able to be recognized (the card reader doesn’t even detect it anymore!).
So the best thing you can and should do is to first copy the contents of the SD-Card(s) to your computer as a back up before proceeding with ANYTHING else.
And you really can’t make this sh*t up😂. I just wanted to check the original (Chinese/as supplied with) name of the the boot partition for this tutorial, and then this happened (yes! that was the Linux/ArkOS partition):
Yeah, so that is now number four which has corrupted itself, which just turned itself into an SD-Card which will no longer boot. So like i said: Ticking time bombs!
3 Drives (Partitions)
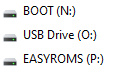
Your Original SD-Card should have three partitions on it, which will (well should) show up as 3 separate drives in windows which would look something like this (and yes, the R36H does also show up as R36S here): 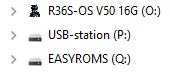
Where the top one (O: on my PC) is the one which contains the boot files, the second one (P: on my pc) contains the Linux OS (this drive is NOT readable from Windows!), and where the third one (Q: on my pc) contains all the ROMs, themes etc.
1.1. What if my SD-Card doesn’t show three drives or doesn’t show anything at all?
Well if it doesn’t show anything at all, then I’m unfortunately not able to help you in this post/tutorial, sorry. It might then be that your card is (already) corrupted, but it might also be something as simple as your microSD->SD-Card adapter not working, your card-reader not supporting the card or the size of the card etc, it could be anything. But do just in case keep reading, because it might be that your drive doesn’t have any drive letters assigned to it (uncommon, but possible).
If you for example only see one or two drives appear when inserting the SD-Card (often only the EASYROMS partitions), then the “fix” is most of the time actually quite simple. However, because this requires a ‘detailed tutorial’ for beginners, I decided to make a separate post about this “problem” which I will link bellow (No worries though, this is simpler than you might think).
One important thing you do have to know before proceeding with “the fix” is that you might get a message from Windows saying that one of the drives is not ready to be used and that it needs to be formatted before you can use it. DO NOT FORMAT IT!
This is just the Linux partition (the Operating System on which your console runs and on which ArkOS is based on), Windows can’t read those partitions and thus thinks that the drive needs to be formatted. Formatting that drive will instantly render the card non-bootable!
The link to the tutorial on how to get the other drive (the BOOT partition for example) to show up in Windows: USB Drive Not Showing Up (fix)
1.2. I got a message saying I need to format the drive before I can use it!
You are probably getting a message like the in the screenshot bellow (where the ? shows a drive letter on your system):
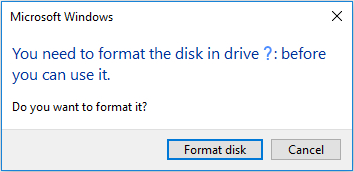
Well simple: Just DO NOT format it, whatever you do: DO. NOT. FORMAT. IT!
This is basically (as explained in the previous section) the Linux partition on which the operating system of the R36S/R36H resides. Windows just isn’t able to read the partition format of Linux (ext4) and thus thinks that the drive is not formatted (or corrupt). But this is simply not the case, if you would proceed to format the drive so “you can use it”, then you basically can’t use it anymore (in your console)! You then just wiped the entire Linux operating system from your SD-Card and turned the partition into an “empty Windows USB stick”.
1.3. Backing-up the (original) boot files
Note: In most cases you can skip this step if you are just upgrading or re-installing an previously installed ArkOS which you already did yourself, however it can still save you some time if you back them up anyway, because you might need some of these files when you have flashed the new ArkOS image to your SD-Card again. This however depends on the screen version in your console.
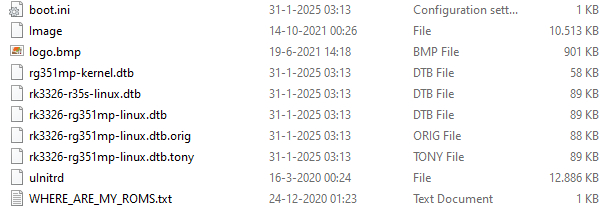
You should be able to see a partition (drive) in your Windows Explorer which is called BOOT or something like R36S-OS V50 16G (or similar) like shown in my screenshot bellow:
When looking at the files on the BOOT drive (or the one starting with R36S or similar) you should be able to see a bunch of files like the list bellow (note: my files might be a bit different from yours, because this structure can of course change in the future):
Recommended steps:
1. Create a folder on your computer itself (for example: R36S Backup)
2. Create a folder named BootBackup in the the folder R36S Backup you’ve just created
3. Copy all the files from your actual boot drive (on the SD-Card as shown above) to the BootBackup folder on your computer
Do note that your SD-Card might contain a few more, less or different files than what I’ve shown here. This can for example happen due to the file structure changing over time after this publication has been made.
1.4. Backing-up the ROMs, savegames etc
In this section I will briefly cover the backup recommendations for both a new/original R36S/R36H SD-Card which came with the console when you bought it, and when you already have a pre-configured system but for example want to upgrade or re-install ArkOS.
New/Original R36S/R36H
If you just received your R36S/R36H and just like me don’t care for the ROM’s that came with the device, then you can basically skip the next step of backing up the ROM’s partition/drive (often called EASYROMS). Personally I only installed ROM’s and other software on mine which I actually dumped and/or own myself. I do understand that there will be many users that would say “Yeah! heck no! I’m not going to dump these 20.000 games that came with it! I paid for them!“
Well NOPE you didn’t! You paid for the console, those game are actually an “illegal bonus” which you don’t have any license for. Aside from the morality of them being illegal, many of the ROMs that get supplied with it are from unknown sources, randomly scrapped from the internet etc. They could (and lots of them WILL) have sketchy issues, rom-hacks/edits applied to them, they might (and again: some WILL) have savegame issues etc etc… Personally I just recommend ditching all those sketchy ROMS’s and just putting your own on your new SD-Card.
I will be leaving in the middle if you are actually going to dump your original games as ROM’s and use them, or that you are going to download them from a more ‘reputable’ source (illegally that is!). Because let’s face it: We all know how a large portion of the emulator retro gaming community works 😉.
So if you DO want to keep the ROM’s supplied with the device, and ignore all the possible issues I just explained to you (aside from them being illegal that is), then you should also follow the next step. But I did want to make sure that you where at least aware of the possible issues with the ‘sketchy ROM’s’ which come with the device.
1.5 Existing Configuration ROM Backup (or still want to keep the ROM’s which came with the device)
If you have ROM’s and savegames etc on your ROM’s / EASYROMS partition, then you definitely want to make a backup of them before proceeding to either Install or upgrade ArkOS using my method! If you do not back them up, you will lose everything on your card!
Do note though that depending on the size of your SD-Card and the amount of roms/games you have installed on it, that it can be ‘quite a backup’ you’ll have to make.
Recommended steps to back up your ROM’s partition:
1. Create a folder called RomBackup in the folder R36S Backup (on your pc) you’ve created in step 1.3
2. Copy all folders and files from the EASYROMS partition/drive into the folder RomBackup on your pc
3. Wait until copying is done😂
TIP
Not “totally unimportant”: do make sure that you have enough storage space free on the drive you are making the backup to (on your pc that is). Because copying this partition can take quite a while if you have a lot of files on it, and it will be quite a disappointment if you have to start all over after 20 minutes because your PC ran out of storage space on the drive you choose to make your backup on😉.

2. Downloading the necessary files and program(s)
Now you’ll first need to download the necessary files needed to install the latest ArkOS on your SD-Card. These downloads include the Operating System image (ArkOS itself), some additional boot files you (might) need for your device and some software programs/tools.
2.1 Downloads Quick-list
If you already know what you’re doing, this isn’t your first rodeo with your device, and you exactly know which files you need, then you can use this quick-list and skip this entire chapter😊. If you are doing this for the first time, are less experienced etc, then please just skip this section (2.1) and read the entire chapter to prevent possible issues with your device or installation!
ArkOS Download: Official ArkOS (use RG351MP) or ArkOS Community Maintained Version
dArkOS Download: https://github.com/christianhaitian/dArkOS/releases (more instructions below for dArkOS download!)
Panel (DTB) Files: Original Screen.zip Screen V1.zip, Screen V2.zip, Screen V3.zip, Screen V4.zip or Screen V4 (60hz).zip
DiskImageTool: Win32DiskImager
[Optional] 7-Zip: 7-Zip
[Optional] Partition Size Modification: XNL R36 Linux Partition Sizer
2.1 Which version of ArkOS
There are basically two version of ArkOS, The official ArkOS and the Community Maintained version of ArkOS. The Community Version of ArkOS is maintained by AeolusUX which is a custom version of the official ArkOS adapted to the R36S and R36H with some additions made to it. Which one you install is all up to you, my personal preference is that I just use the official ArkOS. If I need or want extra things for my ArkOS/Linux I’ll just install them myself.
Some Additional information about the Community Version (AeolusUX) and my reason why I personally prefer the official version can be read by clicking on the ‘Accordion topic’ bellow to open it. But this information is NOT crucial for this tutorial and you can safely skip it if you want.
2.2a. Download The Official ArkOS
The official ArkOS can be downloaded here, do make sure to download the version for the RG351MP (listed as RG351MP/RGB10X)
Note: This is also the (only) version which I support for all my ArkOS tools, programs, scripts etc.
2.2b. Download The Official dArkOS
ArkOS suddenly seems no longer being mainted (I WILL just keep using it myself though, until I have my own distro ready), so if you would like to switch over to the new (Linux Debian based instead of Linux Ubuntu based) dArkOS, then you will need to head over to:
https://github.com/christianhaitian/dArkOS/releases and then selected TWO files to download starting with: dArkOS_RG351MP_
Currently these are:
dArkOS_RG351MP_trixie_01142026.img.7z.001
dArkOS_RG351MP_trixie_01142026.img.7z.002
But these version numbers/names (01142026) will change in the future, just focus on the first part (since that is what you will need for the R36 units 😊, and make sure to download both files!
2.3. Or Download The Community Maintained Version (AeolusUX)
An community version of ArkOS which is (slightly) modified for the R36S/R36H can be downloaded here
IMPORTANT NOTE: Pay attention and follow (possible) instructions on the website of this version to determine which version you have download! Because this depends on the type of display you have in your R36S/R36H (which can vary per console and also depends on when you’ve bought it).
2.4. Download Boot files (“Display Drivers”) for The Official ArkOS
If you’ve downloaded the Community version you most likely can skip this step, because you basically already selected your screen when picking your download at the AeolusUX version. Just make sure that you followed the instructions/info at AeolusUX’s page!

If you (just like me) downloaded the Official ArkOS (RG351MP) image instead, then you might need to download additional files which you will need to place on your BOOT drive after you’ve flashed the SD-Card.
Which files you might need or not depends on your R36S / R36H. These units are sold with several different versions of screens in them, and there is no way to tell which version is installed from just looking at them.
AeolusUX has made a handy tool online which you might be able to use to determine which screen type you have in your unit (using one of the original boot files you’ve backup-ed earlier in step 1.3. I have made a slightly updated (well modified!) version of it, which offers a bit more guidance to beginners, explaining which file you need to upload, which to download etc.
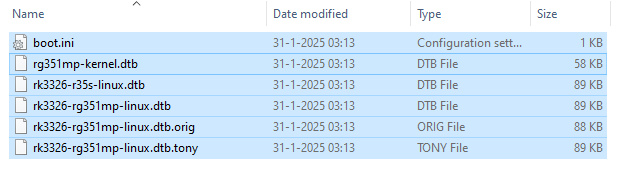
You can either use my modified version of this tool here, or you can of course just use the original version of AeolusUX here and then upload the original rk3326-r35s-linux.dtb, rk3326-rg351mp-linux.dtb or rk3326-r36s-linux.dtb file (sometimes this file has a slightly different name depending on where you bought the R36 from) from your boot drive. The online tool should in most cases then be able to tell you which version you have as you can see on the left. For me the online tool shows that the R36H I used has Panel/Screen 4.
Which would in this instance mean that I would have to download Display/Panel 4 to make sure that my unit still has a working display after flashing the new ArkOS version.
IMPORTANT NOTE: If you don’t have the rk3326-r35s-linux.dtb but instead for example have a rk3326-evb-lp3-v12-linux.dtb (or similar), then it is very likely you do not have a real R36S but a clone! Which would also mean that this tutorial is not compatible for you.
What if my dtb file isn’t recognized but I’m VERY certain I do not have a clone?
Well first off: I’m sorry that I forgot to put this section on the website (since I did cover it in the video but forgot here). But when this happens you can basically just try the Panel ‘drivers’ below one by one on your R36 it’s boot partition so see which one does work. In most cases it then however is just the Panel 4 (at the moment though). And if none of them work, there is a slight chance they have changed the LCD screen after adding this section again, and then I would recommend just using your own original DTB file (the one you have back-uped) and see if that one works with the new ArkOS installation. This will in most cases resolve the problem without any issues😊.
To make it a little bit easier for you, I have bundled each Display / Panel download as zip file which you can download directly using one of the following links (Note: If you used my modified version of the tool, it should have already provided you with a direct download link😊):
Download for Original Panel: Original Screen.zip
Download for Panel 1: Screen V1.zip
Download for Panel 2: Screen V2.zip
Download for Panel 3: Screen V3.zip
Download for Panel 4: Screen V4.zip
Download for Panel 4 60hz: Screen V4 (60hz).zip (READ BELLOW!!)
NOTE: By default the display runs at 77hz! So you are NOT “making it faster” with the 60hz version, so hold your fps/refresh-rate horses😂 and read this piece of info first😉:
But… but… if I have panel 4, do I then need the ‘normal version’ or the 60Hz version for the best performance?
Well the short answer is: If your device runs fine with the 60hz version then I would recommend to use that one. Usually these devices run at a refresh-rate of 77hz, but unlike many of you might think: Higher refresh-rate is not always a good thing (especially with these devices). The brief explanation is that most games run at 60FPS and 30FPS, and running the display at 60hz will often result in a smoother, less jittery gameplay and also prevent screen tearing issues. So if your device uses panel 4, and runs fine at the 60hz ‘driver’, then I would actually recommend the 60hz version.
If you want to know more, or need more convincing because you think that more hz is always better😂, then just ‘unfold’ the section bellow, and I’ll explain in a bit more technical detail why I think you should use the 60hz version.
2.5. Disk Image Tool
Next you’ll need a program to flash the image to the SD-Card, most tutorials will use/explain several tools to do so, I will instead to keep this already extensive tutorial simple by only covering one image tool. If you know what you are doing and prefer a different tool, then use your own, but personally I really recommend this one. But whatever you use: DO NOT USE BALENA ETCHER for this purpose!! There have been various reports of issues and inconsistent performance when using Balena Etcher for the ArkOS images!
I personally recommend using Win32 Disk Imager. I have been using this tool for many years for many purposes and it also works perfectly fine for these devices. So make sure to download it from the link above and install it on your computer to prepare for the next steps.
2.6 Optional – 7-Zip
If you don’t have any additional “archive/zip software” installed and are usually just using Windows to unzip and zip files, then I would strongly recommend to download 7-Zip. Especially if you are planning to do more with your R36S or R36H, because many of the “more serious packages” you can download for these devices are often .xz, .tar, .tar.gz, tar.bz, tar.xz or .7z files. And extracting those can be problematic or even impossible on Windows without using additional software like 7-Zip. If you already have another “archive/zip” manager on your computer, then you probably know what your doing and you don’t need 7-Zip, otherwise just download 7-Zip😊.
Note: Don’t forget to install 7-Zip before getting started in Chapter 3 of course😉
2.7 Optional – XNL R36 Linux Partition Sizer (Now also compatible with dArkOS!)
If you are planning (or might be wanting in the future) to install additional packages, functions, add-ons, applications, drivers or developer tools etc onto your R36S/R36H (which will be installed directly into Linux and NOT onto your ROM’s partition!), then it might be (highly) recommended to assign a bit more storage space to your Linux/ArkOS partition (by taking that extra amount from the ROM’s partition). If you don’t do this but will be installing add-ons, use my XNL Package Manager etc, then you will essentially be taking storage space from ArkOS which has been assigned by the ArkOS Developer to account for future updates.
If you do want to assign some extra storage space to the Linux/ArkOS partition, then you can download my XNL R36 Linux Partition Sizer to do this for you in an extremely easy way once you’ve flashed the ArkOS image to your SD-Card.
08-11-2025 Update: I’ve now also released a Linux version of the XNL R36 Linux Partition Sizer
3. Preparing the downloaded files for use
You should now have (at least) two files which you will need to flash and prepare your R36S / R36H:

(or three files if you’re using dArkOS)
Your filenames can of course be a bit different depending on the Screen version you need and the ArkOS filename having changed in the future due to updates. But basically you should have a .img.xz file and a .zip file.
I do have those files but don’t see the .zip part or the .xz part?
That might be because Microsoft has made the stupid decision to by default hide extensions for known file types, which might mean you won’t be able to see the .zip part of the file. If this is the case, then I have written a tutorial here to enable them (and I strongly recommend enabling them, not just for this tutorial, but for security reasons in general which are explained in that (much shorter) tutorial.
3.1 PAY ATTENTION HERE This part is very important!
dArkOS:
If you’re using dArkOS, you will have downloaded two files from the releases page of dArkOS, one ending in 001 and one ending in 002:
dArkOS_RG351MP_trixie_01142026.img.7z.001
dArkOS_RG351MP_trixie_01142026.img.7z.002
Right click on the file ending with .001 and open the 7-Zip Submenu, and then click on exctract here. From here on follow the rest of the tutorial to resume the ‘normal path’ to install/update ArkOS/dArkOS 😊.
ArkOS:
Now you will need to use 7-zip to extract the ArkOS_RG351MP_ .img.xz file by right-clicking on it, opening the 7-Zip Submenu, and then click on Extract Here.
[Rest of the file(s)]
This will take a while because it will (currently) extract about 8GB! of data from that
.xz archive (so make sure you have enough storage space on the hard-drive you’re extracting it on)
The reason why I’m being so ‘blunt’ with the title of this section is because I have seen countless of people reading over (of just blindly ignoring!) the instructions on the Official ArkOS Wiki, about needing to extract the .xz file and then later on starting to complain that flashing that “image” keeps failing or that the console just doesn’t boot. YEAH, Sherlock, that’s because you’re not trying to flash an image but an archive! 😉😂.
Next you’ll do the same for the zip file which has your screen files in it, but instead of clicking on ‘Extract here‘, you will now use ‘Extract to Screen V4 (60hz)\” for that zip file (where it of course has the filename which matches your screen).
If everything went according to plan, your folder should now look something like this:

4. Preparing the SD-Card
IMPORTANT:
Use your new / good brand SD-Card from here on! DO NOT use, erase, flash etc the original card which came with your R36S/R36H! Not only because those cards are extremely unreliable, but also because you then always have at least “something” to revert to (temporarily) if for some (weird) reason your fresh ArkOS installation won’t run on your R36S/R36H. If you do still decide to use the original (crappy) SD-Card which came with your R36S/R36H (against all advice from me and LOTS of community users!), then sorry to say, but then it’s completely your own fault when everything goes to hell 😉
NOTE: If you are literally using a brand new SD-Card which has not been used for an ArkOS installation previously, then you can skip to Chapter 5
Depending on the current state of your SD-Card, you might need to prepare it first, to prevent possible issues when flashing it. It is important that your SD-Card consists out of just one partition before you start flashing the new ArkOS (update) to it.
This simply put means that if you insert your SD-Card (or USB Card-reader with the SD-Card in it) into your computer that you should only be able to see one (extra) drive popup which is (approximately) the size which the card should be.
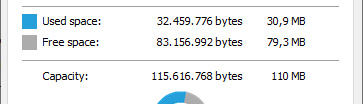
If I would for example right-click on a brand new/empty 32GB card and then click properties, then I will see something like you can see in the example here. It indicates that it is 28.8GB on one drive (N:\ in my case here). This basically means that this card is configured to just have one partition.
NOTE: The 32GB vs the actual 28.8GB is normal, there is a whole technical story behind this, but let’s just skip that in this already long enough tutorial 😉.
If you however have a 32GB SD-Card like I’m showing here, and it shows up with a size nowhere near the 32GB, then it is very likely that the SD-Card has previously been setup with multiple partitions. The example here shows just 110MB for the 32GB SD-Card, so we will definitely have to ‘fix’ this before we can proceed.
If your SD-Card is just configured as one single partition , then you can just skip to chapter 5
But if you are not sure, then I do recommend to at least check if your SD-Card consists out of one solid partition by following chapter 4.1. If it then still turns out to be one solid SD-Card so to speak, then you can still just skip the rest of this chapter and resume at chapter 5😊
4.1 Computer Management
To ‘fix’ a multi-partition SD-Card, we’re going to use Computer Management to remove the partitions from the SD-Card and create one solid partition again, so that we can flash the image to this SD-Card.
Just follow the following steps and you should be fine 😊
– First open Computer Management (if you can’t find it or don’t know how, then just type compmgmt in the start menu😊)
When the Computer Management has opened you’ll want to click on Disk Management in the left panel and then you’ll have to find your SD-Card. In the example bellow I have ‘highlighted’ the SD-Card I’m using for this tutorial with a red box:
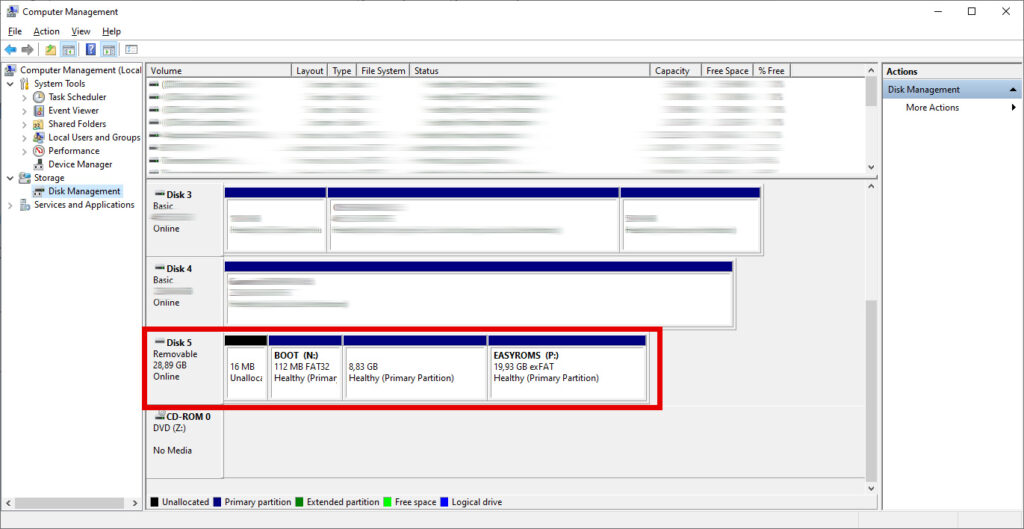
As you might be able to notice, it is indeed the 32GB SD-Card (showing up as 28,89GB, which again is normal), but it’s divided in multiple blocks. A block called BOOT (N:), a ‘nameless block’ of 8.83GB, which is the actual Linux operating system (ArkOS) and another block called EASYROMS (P:) of 19,93GB.
This is because this card already had a working ArkOS installation on it which I use for development and testing (but am wiping now just for this tutorial😂). But if you for example want (or need) to re-install ArkOS on your SD-Card, then you will also need to do the following steps to remove these ‘divided blocks’ called partitions before you can flash the image to the SD-Card again.
!! WARNING – WARNING – WARNING – WARNING !!
Ow did I said WARNING already? Neat, now that I’ve got your attention: Make sure that you have backed-up ANYTHING and EVERYTHING you want to keep from both the BOOT partition and the EASYROMS partition (as explained in chapter 1.3, 1.4 and 1.5) BEFORE proceeding with the next step(s)!
When proceeding from here on you will LOSE ALL DATA ON THE SD-CARD!
!ANOTHER WARNING!
Also make sure that you are ABSOLUTELY CERTAIN that you have selected and are working on the SD-Card while working in the Computer Management tool! If I would do the following step(s) on one of the drives above the SD-Card (like for example DISK 4 in my screenshot above), then I would instantly ‘wipe’ a disk with 4TB of data on it! SO BE CAREFUL and make sure to SELECT THE CORRECT DRIVE!
PROCEED AT YOUR OWN RISK
Yup, unfortunately I do have to say this, because I just won’t accept any claims like ‘I lost all data due to your tutorial!‘. If you however pay attention, select the correct drive and partition(s), then everything will be just fine😊
4.3 Removing The Partitions
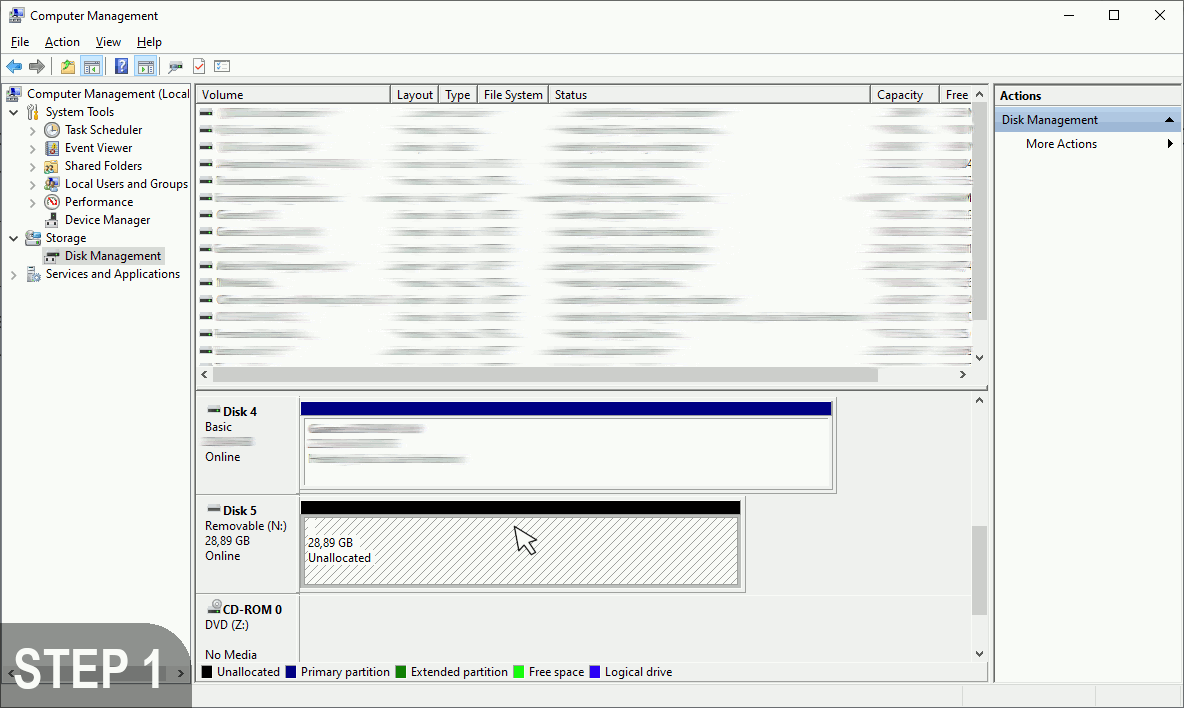
Now that you realize that you’ll have to pay attention 😉, we’ll resume removing the partitions so we can make one single partition again. Simply right-click on each of the partitions (on the SD-Card of course!), then click on Delete Volume and then confirm by clicking on Yes.
To make sure that this doesn’t sound to confusing or ‘scary’ for beginners, I’ve also made an animated GIF demonstrating the entire process of me removing all three partitions from my SD-Card:

NOTE: I’m removing three partitions here because I’m “clearing” an SD-Card from a previous ArkOS installation, but it could also be that your SD-Card only has one or two partitions if it has been configured differently previously.
And the message you might have noticed at step 4? That is basically an ‘extra warning’ from Windows that it has detected an partition which was not made by Windows. And Windows was correct here, because that was actually the Linux operating system partition (ArkOS).
4.4 Creating (one) New Partition
Next we’re going to create one single partition on this SD-Card. This will later-on be turned onto 3 different ones by the image tool we’re going to use, but that’s okay😊. To make sure that we don’t get any issues during the flash process it’s best that we turn the SD-Card back into one drive again.
To do this you can simply right-click on the ‘unallocated space‘ of your SD-Card, then click on New Simple Volume and basically just keep clicking Next through all the screens you are about to see (of the New Simple Volume Wizard). You don’t have to worry about changing any settings or options. And to ensure that this section is not too overwhelming for beginners (or those that just really want to make sure that everything is correct), I’ve also made an animated GIF of this ‘process’:
Your SD-Card is now basically ready to flash the (new) image of ArkOS onto it.
Personally I would recommend to remove the SD-Card from your computer and to reinsert it again. This is to ensure that the drive letters are actually properly assigned. Most of the time this won’t be an issue, but I did had it once or twice that after removing the partitions that the SD-Card was still listed with one of the drive letters from one of the removed partitions. This should not give any problems, but when it comes to flashing (well writing sectors!) directly to a drive, you do want to play it safe. So just remove the SD-card, re-insert it and then proceed to the next step.
5. Flashing The Image To The SD-Card
First make sure that you know the correct drive letter of your SD-Card, and really verify this! If you would for example resume with the next step and you have another USB drive, SD-Card or whatever inserted in your computer, then you might be able to select the incorrect drive with Win32 Disk Imager and destroy all the data on that disk when writing the image to it!
So make sure you know the correct drive letter of your SD-Card by confirming in Windows Explorer that you now have an empty SD-Card at the drive letter you expect it to be (for my computer this will be drive letter O:\ as you could have seen in the last screen of the animated GIF above). But you might also have noticed that during the process of creating a new partition that it has changed from N:\ to O:\ which is why I’m insisting so much to double check.

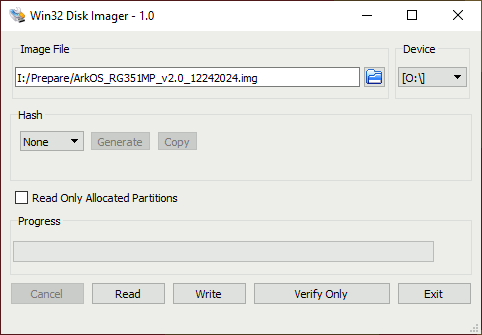
Once you are absolutely certain which Drive letter your SD-Card has, you can start Win32 Disk Imager and follow the following steps:
1. Click on the folder icon and then browse to the folder where you have unpacked your ArkOS .img file and select the ArkOS/dArkOS .img file, so that it appears in the textbox next to the folder icon.
2. Select the correct drive letter for your SD-Card (for me this is O:\ but for you this will most likely be a different drive letter!)
3. Click the Write button and click Yes when Win32 Disk Imager asks if you want to continue because: “Writing to a physical device can corrupt the device.“. This message is normal and nothing to worry about (just make sure that you have selected the correct drive letter!).
NOTE: Some tutorials claim or even urge that you also have to check the ‘Read Only Allocated Partitions’ checkbox when writing the image to the SD card, but this is simply not true! I will give a brief explanation of this checkbox for completeness sake but if you don’t care about that, then you can just skip this ‘text-block’. That checkbox is meant for when you are making a backup FROM an SD-Card, USB drive etc and making an image (img) file FROM that drive. If that drive would for example be 32GB but it only has 2 partitions of 2GB each, then Win32 Disk Imager will only copy (image) the two partitions with a total of 4GB. But if you don’t check that checkbox, then it will copy the entire drive, including all unallocated space, sectors etc into the image (a full 1:1 clone) and thus make a image file of 32GB which will include both 2GB partitions, but also all empty/unallocated space. However, that checkbox does not serve any purpose when it comes to writing an image TO an SD-Card 😊. So those tutorials are incorrect in regards to that part 😉.
It will take some time to write the image to the SD-Card after you’ve confirmed that you want to continue.
When Win32 Disk Imager is done, it will give you a notification. Most likely you will shortly after Win32 Disk Imager finishes also get a Windows Pop-up, telling you that you will need to format the disk before you can use it.
But DO NOT FORMAT IT after the image has been flashed! Or you can start the whole process all over again. That is like explained in the beginning, just Windows which doesn’t recognize the Linux partition for ArkOS.
DO NOT insert the SD-Card into your console yet! And DO NOT copy your roms, games, savegames etc to your SD-Card either yet! We’re not done here. No worries though, I will tell you when you can (finally) copy your roms, games, savegames etc (back) to your SD-Card 😊
6. Copying The Boot Files to the SD-Card (your ‘display drivers’)
Before you insert the SD-Card into your R36S/R36H, you’ll now first need to copy the display/panel files you’ve downloaded earlier (at chapter 2.4) to your SD-Card.
In the same folder as your ArkOS/dArkOS .img file, you should also have a folder which contains the extracted files from your Display .zip file, in this folder you will see a couple of files like these:
IMPORTANT WHEN USING dArkOS: DO NOT Copy the boot.ini! For ArkOS you DO copy it, for dArkOS you DON’T!
Just copy all these files onto the Boot Partition/Drive which you just finished flashing (often it’s literally called BOOT after flashing has completed).
Windows will of course ask you if you want to replace the files with the same names, and you should just replace the files in the destination (on the SD-Card).
7. [Optional] XNL R36 Linux Partition Sizer (now also dArkOS compatible)
If you’re planning (or wanting) to get more out of your R36S/R36H than it just being a yet another “boring”😉 Retro Console, and thus you would want to install additional programs, packages, add-ons, tools, Linux native applications, a desktop environment, development tools or anything alike. Then it is highly recommended to assign some additional storage space to your Linux/ArkOS partition (by ‘sacrificing’ some storage space from your ROM’s partition). This because such tools are often installed into Linux/ArkOS itself, and thus do not reside on your ROM’s partition.
ArkOS itself already has quite some free storage space after installation, however this has been done by the ArkOS Developer to take additional future updates into account. Therefor it is not recommended to ‘take up’ this ‘reserved’ storage space with your add-ons and other additional stuff, to prevent possible issues in the future with ArkOS updates for example.
I have developed a program which makes it super easy to assign additional storage space to your Linux/ArkOS partition, without you needing to modifying files or scripts manually 😊:

17-01-2026 Update: Version 2.0.1 has been released which now supports both ArkOS and dArkOS (automatically)
08-11-2025 Update: I’ve now also released a Linux version of the XNL R36 Linux Partition Sizer
With the XNL R36 Linux Partition Sizer it is literally as easy as dragging a slider across the screen and then clicking on Save & Exit 😊
As you can see above, I have set my Linux/ArkOS partition to 40GB and the games (ROM’s) partition to around 200GB, and then this will be the result when you’ve completed the entire tutorial (this illustrates the sizes of both partitions on my R36H after using my program):


NOTE: These sizes are NOT the general recommended sizes! I use this extremely large Linux partition size for development and testing purposes!
What size would I need or is recommended for my use?
Well that is a very good question😊, do NOT use the same sizes as I showed above though! Because those sizes are WAY over-the-top for most users. I would instead recommend you to take a look at the information on the XNL R36 Linux Partition Sizer page and then looking at the information further down at that page. There I will keep the recommended sizes (depending on what you might want or need) up-to-date. The reason why I won’t put recommendations here, is because those might get outdated (and forgotten to update) as I might develop more XNL Package Manager installations (a installation system I’m currently still working on).
How to use it
Using the XNL R36 Linux Partition Sizer is very simple: Start the program right after flashing the image to your SD-Card, select/set the desired size for your Linux Partition and then click on Save & Exit. Then you remove the SD card from your PC.
WARNING
If you want to assign additional storage space to your Linux/ArkOS partition, then you’ll really HAVE to do this right after you’ve flashed the image to the SD-Card. Even if you’ve booted the SD-Card only once in your R36S/R36H, then it will no longer be possible to assign additional storage space to your Linux/ArkOS partition with my program anymore!
From here on you can just resume at the next chapter (8) and ArkOS will do the rest (like preparing and sizing the partitions with the sizes set by you 😊)
8. First Time Booting (the new ArkOS/dArkOS installation)
After completing the previous step(s), it is now time to insert the freshly flashed SD-Card into your R36S/R36H. Do obviously make sure your R36 is turned off when doing so 😉. I would also strongly recommend to remove the second SD-Card during this process if you are using a secondary SD-Card!
Just in case I would also like to recommend you that you make sure that your R36 has enough battery power left or that you connect it to the charger during this process. Don’t worry, the process won’t take that long actually (just about 3 minutes or so), but the system will be doing some crucial modifications to the filesystem during these minutes. And if your R36S/H would fall-flat in the middle of this process, you might damage the operating system or file system, which would result in you having to start the whole flashing process all over again.
You can now (if you hadn’t already) insert the SD-Card into the TF1-OS slot. This is for both the R36S and the R36H the right SD slot when looking at the screen of the device.
Turn on the R36S/H, and patiently wait while ArkOS ‘does it’s thing’, prepares the system and expands the EASYROMS partition (so you can later on use it it for your roms, games and savegames.). If your screen is working properly (due to you having copied the correct boot files), the you will see some messages pop-up, a bunch of lines ‘fly over your screen’ etc. This is normal an you should just let it do it’s thing😊.
8.1 HELP! I don’t have any image on my screen / my screen is all white (and sometimes with stripes!) etc!
No worries, and above all: DO NOT PANIC!😊. This most likely just means that you have downloaded the incorrect display files at chapter 2.4.
To “keep the flow a bit going” for the tutorial, I have “hidden” possible issues and solutions if your screen doesn’t turn on, turns white and what not in a ‘spoiler box’ bellow. Just click on it if you are having issues with your display after installing a new ArkOS/dArkOS on your SD-Card. Otherwise just skip the ‘blue box’ bellow and continue with the next chapter😊
9. Copying the ROM’s, savegames etc (back) onto your SD-Card
If your R36S/R36H completed the initial boot process and you are now seeing EmulationStation, then you can turn off the console so we can start copying your ROM’s and savegames (back) onto your SD-Card.
If you would now insert the SD-Card back into your card-reader, you should have three drives “pop-up” in your Windows File Explorer (the drive letters will most likely be different for your computer): BOOT, USB Drive and EASYROMS. The EASYROMS Partition (P: on my computer) is the one to which you will have to copy your ROM’s, savegames and other additional programs, games, scripts etc.
One small but important side-note I do want to give here, is that it is NOT recommended to just “copy-and-dump” the entire backup you’ve made earlier in the folder RomBackup (Chapter 1.5) onto your SD-Card if that was a backup of the original ‘Chinese SD-Card‘ which came with it!
Not only because you will end up with a ridiculous (and unmanageable) amount of games which you’ll never EVER be able to play-through all of them, and you can say whatever you want, but if you claim that you will be able to play through all 11K to sometimes even 50K games (ROM’s) that come with these consoles, then I just simply don’t believe you😂 And if you really do have the time to do that? Then in my opinion you should really start to reconsider your life choices🤷🏽♀️😂.
Lots of the ROM’s that are on the original SD-Cards which come with these devices can and will have various issues, glitches, strange rom-hacks etc.
But most importantly, the original SD-Card has bios files on it which might conflict (or even break) the ones that are supplied with your new ArkOS installation, causing some emulators to no longer work for example (or it might cause other less obvious issues). Therefor I would strongly recommend to just take your time to sort what you really want to have on your console, and what you are actually going to play (at some point). Yes this will take some time, but trust me: It’s worth it in the long haul!
It will also be EXTREMELY annoying if you for example have 2000 gameboy roms on it, and you just want to play your Pokémon Red but you’ll have to scroll all the way down to find it because you have an absurd amount or ROM’s on the device (of which you won’t even play most of them).
In my personal opinion you should not use any of the (illegally) supplied ROM’s that came with the device and instead just dump your own (originally owned) cartridges etc to your SD-Card, but (again) like I said before; we all know that that’s not gonna happen for most users who bought one of these consoles😉. But do at least consider my tip about sorting the ROM’s/games before just ‘dumping everything back onto your SD-Card’
If you already had a previously sorted/owned collection of ROM’s/games, and you where just reinstalling or updating ArkOS, then you can of course just copy all your ROM’s/games back to your SD-Card. Do however yet again keep the original bios files in mind that came with your new ArkOS installation. Replacing them with your back up might still break certain emulators.
10. I Used ArkOS Update (menu) and now my display doesn’t work anymore!
I will instantly have to say that I’ve only read/heard this from ‘online rumors’ and have not experienced it myself! But in theory it could indeed happen that if you use the Update function from within ArkOS (on your console that is), that your screen suddenly doesn’t work anymore upon rebooting.
IF this happens, then this would most likely be because the developer has updated the boot files, and that could mean (because the R36S and R36H are officially not supported) that your boot files don’t match with your display anymore. IF this is the case then I would first recommend to check if there are new versions of the correct boot files for your device available, where the most logical location would either be this page (to see if it has been updated), or directly from the source where I also get the boot files from: AeolusUX DTB Files. And if there aren’t any new versions for your display panel (yet), then I would just recommend to use (re-copy) the ones that used to work back onto your boot drive for the time being (until an updated version might get released for example).
But again: for now this is only a precautions part of the tutorial based on ‘read rumors’ from just a few users.
11. Additional Tips
In this additional chapter I will give some additional tips, tricks and info in regards to using your R36S/R36H and ArkOS. This list might (and most likely will get expanded in the future if I notice that people are struggling with certain things/issues, or when for example new (important) features get added (either by me myself or via the Official ArkOS releases).
11.1 Recovery Mode/Boot
If you ever seriously mess something up in/with EmulationStation while messing around over SSH, or over FTP, and your device won’t boot normally into EmulationStation anymore for example, then you can often still use the Boot and Recovery Tools menu (in short: BaRT). How to enter this ‘recovery mode’: Simply turn off your R36S/R36H, and then directly after turning it on keep holding down the B button
When doing so you will after a few seconds boot into the following menu:
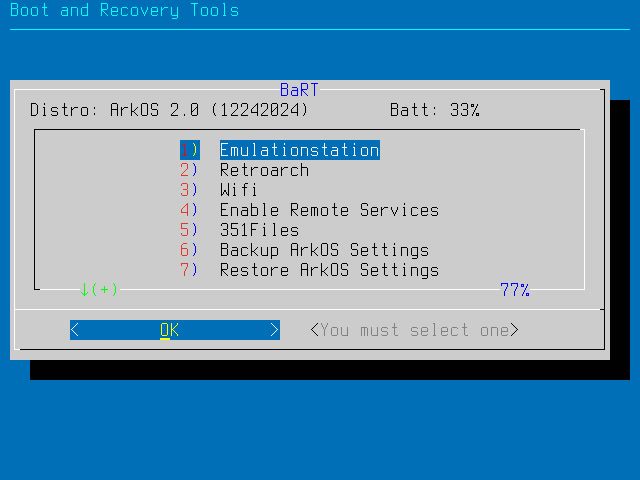
As you can see, you can choose to boot into EmulationStation and Retroarch directly, but you will also be able to manage your Wifi connections from here, enable the remote services (so you have access to SSH and FTP when connected to wifi), use the 351Files Application (ArkOS Filebrowser) and backup or restore ArkOS settings. These tools should in most cases be more than enough to get your console back up and running again if you for example accidentally edited, renamed or deleted the wrong file.
What if even BaRT doesn’t work anymore?
Well then it’s most likely a much more serious issue, and then I don’t have a simple answer for you either. Problems like this can then suddenly become quite complex fast. In most cases you would then just need to reinstall ArkOS onto your SD-Card (unless you really know what you’re doing when it comes to manipulating Linux system files). Do however not forget to backup your ROM’s and/or savegames if you would have to reinstall ArkOS for some reason!
11.2 Power button setting / “tweak”
If you don’t like the ‘Standby mode’ the R36S/R36H uses by default when pressing the power button, then you can change the behavior of the power button by opening the EmulationStation Settings Menu (by pressing START), then go to ADVANCED SETTINGS and then turn the SWITCH POWER BUTTON TAP TO OFF option ON. The system will now just properly shutdown with a single press of the power button.
WARNING
If you do want to use the ‘standby mode’, then DO NOT turn off the device by holding down the power button if you want to turn it off completely! This is NOT the correct method and could cause damage to the filesystem, which in turn could result in you having to reinstall the entire image! The correct way of shutting down the device (when the power button is used as ‘standby mode’), is by opening the settings menu (pressing START), and then navigate down to QUIT. From there you can choose SHUTDOWN SYSTEM to properly shutdown the system.
11.3 Set The Correct Time Zone
It might sound like something super trivial or even completely useless to some, but I would strongly recommend to set the correct timezone in your R36S/R36H, especially if you have modified your console to have build-in wifi or if you use a USB Wifi dongle for internet connectivity. Because if you set the correct timezone, then savegames etc will also show the correct time, same goes for other additional files you create or modify on the device itself (like screenshots for example). Do note though, that if you don’t use/have Wifi at all, then it doesn’t have much use to set the timezone, because the R36S/R36H doesn’t have an internal RTC (Real Time Clock, which would keep time even if the device is powered off). Setting the correct timezone can be done by opening the EmulationStation Settings (pressing START) and then going to ADVANCED SETTINGS. The first option will then be TIMEZONE. Press A on this option and wait for a while! Because it is quite a long list of supported timezones, it will take a while to load, and it might seem like nothing is happening at first, but the system is just loading in the timezones list😊.
11.4 VRAM LIMIT In the EmulationStation Settings
I have seen a few posts here and there randomly where people claimed that you should turn up the VRAM LIMIT which can be found in the EmulationStation Settings (START -> ADVANCED SETTINGS) all the way for the best graphical performance in more demanding games. Well NO you should NOT actually 😂. I have even read one user that was very persistent in claiming that he could really notice the performance difference in the games “BIG TIME“, well hello placebo effect buddy😉😂. Because that setting doesn’t have ANYTHING to do with the VRAM reserved (or used) FOR the games at all. This setting is basically to set the VRAM limit which the EmulationStation Frontend (“The Menu”) can use for rendering it’s menus, box-art etc. And thus this setting only affects EmulationStation, and NOT how much VRAM you are “assigning to Video Games” 😉.
When or how do I use this VRAM then?
Well if you’re not having any issues with the theme you’re using, then you don’t have to ‘mess’ with this setting at all, period. It’s simple as that 😉. BUT If you do have a (bit) more demanding theme which seems to be slow, isn’t smoothing during navigating, has issues loading or showing box-art properly etc, then you might try increasing the VRAM LIMIT slightly. Personally I would then recommend to just add 25MB, reboot EmulationStation (just in case), and trying again. If the problem persists just add another 25MB and see how that goes. But in my opinion if you need to add ‘hundreds of MB’s’ just for a simple theme on your R36S/R36H, then you either have a crappy optimized theme or you are trying some bonkers stuff like for example (going to the extreme here) trying to run a full 4K theme which isn’t designed for these devices at all, but is for example intended to be used on the Raspberry Pi 5 or even a full blown Windows/Linux installation of EmulationStation.
WARNING
There have been reports here and there (unconfirmed by me though, and don’t feel the urge to test this either😂) that EmulationStation can crash or cause other (serious) graphical issues if you increase the limit too far. I’m not 100% certain if this is true of not, but just in case someone would think “Well I’m just going to max it out“: You have been warned.
11.5 Default Button Shortcuts
The exact shortcuts and button combinations can (and will) vary depending on the emulator/system you are running, but there are a few buttons and/or combinations that are quite handy (or even important) to know from the get-go:
[R1 & L1] – Page-down & Page-up
Often on screens where you have a lot of text, options, roms etc you can use R1 and L1 as as Page-down (R1) and Page-up (L1)
[SELECT + START] – Quicting/exiting (nearly) all programs, games etc
You can exit/terminate nearly all games, programs, scripts etc by pressing SELECT + START twice
[R3 + D-pad up/down] – Change Screen Brightness
A less known but quite handy to know button shortcut, is pressing down (and holding down) the right stick (AKA R3) and then pressing the d-pad up and down will increase or decrease the screen’s brightness. This can be very handy while you’re playing a game because you don’t have to leave the game to adjust the brightness in the settings menu of EmulationStation anymore if you know this shortcut 😊.
[SELECT + X] – Open Retroarch Menu
To open the Retroarch menu while playing a game, you can press (and hold) the SELECT button followed by the X button.
[SELECT + A] Reset Emulator/Game (Retroarch)
For many emulators you can press (and hold) SELECT followed by pressing the B button to reset the emulator. NOTE: This will for the emulators that support this feature mean an ‘intant reset’! So if you have unsaved progress you will lose this progress!
[SELECT + B] – Emulator Pauze/Freeze (Retroarch)
Some games don’t support pause (or don’t allow it during certain parts of a game), but by pressing (and holding down) SELECT followed by the B button you can make the emulator itself just pause. So even if you’re for example playing a GBC game which doesn’t allow pause, you can still pause it using this shortcut😊
XNL Insider Program
NOTE: This section only applies to the XNL Future Technologies crew and a few external members of the XNL Insider Program.
If you have (re-)installed your ArkOS and you have lost your copy of the XNL Insider Program installer and/or your XNL Insider Program Activator, then you can contact me directly to obtain a new copy of your (personal) XNL Insider Program files. These are not availible from the website for security reasons (not from your ‘Crew Login Area’ either anymore!). It is however your responsibility to keep a safe backup of these files though.
Thank you for your time
hopefully this (extremely) extended tutorial will be usefull for some people 😊. It you want to support my tutorials, work, releases and other content, then please consider checking out and subscribing to my YouTube. Do note though, that my YouTube is not only about these retro consoles, and that it’s not even the main topic(s) on my channel. The main topics on this channel are 3D printing, DIY projects, hacks, mods, programming, 3D modeling and all kinds of things like that😊. So if you would only be interested in these consoles, then subscribing might honestly not be recommended for you though😊.
For now, Happy Gaming😊
TIP: You can find my entire collection of projects, information and more of the alike regarding the R36 (and ArkOS) on my R36S (and R36H) ArkOS Central Page and you can also find a tutorial about Installing WiFi (and my custom driver installer) on your R36 here
Tip for German Mac/Apple users
I recently received a message about someone who has made a German tutorial for ArkOS on the R36S when using MacOS, and I decided to add it here as reference for those who need it: https://www.boardprojects.com/arkos-auf-r36s-installieren-anleitung-fuer-mac-nutzer/


hi, i did follow your instructions, but unfortunately i cant get past method 5..flashing image using win32disk imager…when reaching 2% it just stops then an error window pops up saying error occured when attemptiong to write data to handle. error 23 data error cyclic redundancy check.. i downloaded the required files from the links you gave, then the SDCARD is newly purchased a sandisk 64Gb…can you you tell me what seems to be the probelm…tyvm
Hey, I have had a few people having this issue, and my guess is that it has something to do with certain SD-Cards (and their ‘internal makeup’ to explain it simple) when using Win32DiskImager.
I would recommend downloading and using Rufus (that’s the name of the program) to see if that resolves your issue. For most people it will work if they are having issues with Win32DiskImager 😊.
Using Rufus is pretty straight forward:
– Start the program (after downloading of course 😉)
– Then select your device/SD-Card
– Then Select the ArkOS image you’ve downloaded
and click Start
Nothing more fancy to it 😊.
IMPORTANT NOTE: (I’m guessing you already did this considering you’ve mentioned following the instructions, but just to be sure): Do make sure you have actually extracted the ArkOS .img file from the .xz archive you’ve downloaded, otherwise it will also give an error similar to this one.
IF you would like to do me a favor, could you perhaps first make a screenshot for me of the error you’re receiving so I can update the tutorial with it so I can include Rufus instructions for others whom are having similar issues to yours? I will of course credit you for the screenshot 😊.
If are willing to do so, you can email me the screenshot to arkos @ teamxnl .com (without spaces)😊
Thanks and good luck😊
Finally, I got back my r36s. I tried many time with youtube tutorials to flash arkos(community made) and it gave me alot of problems. Here are some 1. My select+start to quit from game is not working 2. Cant call retroarch by select+x and instead, i need to use R3 3.loading time so long and missing my cheat files evertime i download and add it. But it all gone with this method and I use your suggested version. Thank you.
Well thank you VERY much for your feedback man😊, absolutely appreciate it 😊. Comment’s like these make it worth the time and effort of writing articles like these😊.
Glad you finally got your R36S working as it should, and hope you’ll enjoy it for a long time to come👍🏽
Thank you for this very detailed article, much appreciated! For the German retro handheld community, I’ve put together a dedicated guide for the R36S, specifically aimed at Mac users.
I couldn’t find a short and easy-to-follow tutorial out there, so I decided to create one myself to help others who might be facing the same challenges.
[Moderator note]
I’ve added the link which was included in this comment into the main article (at the bottom). So if you’re using the MacOS tutorial (in German) linked from my tutorial, then it’s the one made by this user 😊
Thanks👍🏽
Thanks 😊 I’ve added the link to your tutorial to my main blog post at the bottom 😊👍🏽
Just read all your tutorials and I found them the best from the internet till now, that is why i put my hope in helping me:
Right joystick swaped axis x with y:
R36s shiped with original rom arkos 2.0 08232024 aeux
Emulstation v2.13.0.0
Updated on a new card to latest version 06302025-1, could not boot, i can see boot screen corectly then completly blank.”Fixed” this by replacint boot ini and all dtb files from original sd-08232024. All good working wonderfull except the joystics are swaped, left one appear as right in controller testing app, and the phisical right one appear as analog L.
The left one had inverted axis e.g. pres left shows right – fixed this by recompiling the dtb ->dts ( edited with notepad++)
But i do not know how to fix the right one – it has swaped axis x with y..( e.g. when i press left it goes up and when i press up it goes right)
How can i fix this please..tried for 2 days but i have no linux eperience.
First off: “but i have no linux eperience”, but yet you’re the first I come across which knows how to use dtc 😉😂 (or at least another tool to decompile/recompile the DTB’s😂👍🏽).
Did you confirm (or are you able to confirm) that you actually have a legit R36S and not a clone? Since those can be different and require other configs or even a custom rom for that matter (which of course then in basic essence just has different config in it, and possibly a couple different drivers).
Personally I have not once encountered an R36S or H which actually had it’s sticks swapped (so I think it’s quite an interesting observation). I did had ONE R36H (just one🤷🏽♀️) where Doom (the ported version) had UP/Down looking inverted but that was strangely also the ONLY game which had that issue (I could simply fix that by inverting it in the settings). And what makes it even weirder, is that I’m basically using the SAME rom file (stored on my NAS) for all my installs🤷🏽♀️. I do recall some Soysauce (or however they are called clones having such issues), but will look in that in a moment and get back to this..
IF I’m correct (I skimmed past it last week or so, but am currently working on something else in between instead of the ArkOS stuff), so I’m not 100% sure, but I thought I had seen quite a few new screens (as in panel dtb’s) on AeolusUX’s github. Including support for quite a few other clones and/or devices.
I have currently absolutely NO CLUE at all why your sticks are inverted though, sorry. My main suspicion (but again: JUST an suspicion) is that your R36 is possibly an clone which has it’s I/O’s configured differently.
If you are comfortable with it, you might be able to download for example the panel 4 DTB’s from my website, decompile them and then compare them with yours which DO work but have the sticks inverted/swapped. However considering the addressing used in the DTB is the same for each stick (<0xc8>), you can’t just change it in the DTB. It would for example need to be done at firmware (driver) level or with remapping it.
Getting back to the Soysauce thing:
After searching for quite a while, I found this one on AeoluxUS’s github:
https://github.com/AeolusUX/ArkOS-R3XS/issues/95
A little bit further in that thread I noticed some users having it solved with using different DTB files 😊
I THINK you will find your answers there though 😊. Could you if possible provide me with the version number and other info
which is printed on the PCB (Circuit board) of your R36? (This does of course require you to open it though). If you are able to, there should be white text on the PCB telling which board it is, which version etc… Try to provide as much information as possible if you like 😊
Absolute Last Resort Idea:
And an absolute insane DIY idea IF there would be no other solution at all… considering you mention that Left = Up, Up = Right, you MIGHT be able to dissemble the unit and rotate the right stick 90 degrees. You might need an small extension for the short ribbon cable, but it would/could be a last resort though 🤷🏽♀️😊
I was intrigued why original rom has no issues with the controls, but cannot run all portmaster games and latest arkos downloaded by me control was bad but portmaster works.
I am learning a lot with this little console, I just googled about dtb files – funny thing I used a cloud hosted ubuntu VM to recompile the files (also learning cloud) because I do not have a linux PC.
Now, solved it:
First solution: managed to implement workaround – remap in all emulators including the most important issue with portmaster – changing gamecontrollerdb.txt mappings and fixed everything in all portmaster games 🙂
Second solution: opened the console, on PCB Y3506_V03_20241210
– google it – downloaded boot.zip from first reddit post – replaced all boot files – working fine (except FN swapped with select, and led always on)
In the end stayed with first solution because already remapped all buttons, FN and select are ok and the led is off, but with the next update will use “Soy Sauce Console” boot files.
So lesson learned – replace all boot files not only dtb – the structure of those files (or the files/partitions) still remains a mystery for me, maybe you will detail the meaning of each one in another tutorial or here 🙂
Many thanks again, for all your help and tutorials 🙂 keep on the same work.
Well first off: KUDOS! 😊👍🏽 for actually trying and experimenting sooo much yourself 😊. “Pro tip:” You can also use programs like VMWare etc on a Windows pc to run linux installations without having to install them on your machine (just in case you didn’t knew yet) 😊
The remapping is indeed also a viable option, DO however keep in mind that with some devices (not just these ones) it MIGHT actually cause damage IF for example charge controllers etc are not properly configured. I’m currently working on a project where I’m reviving old tablets to full modern Linux Kernels, and some configs SEEM to work properly, but if you would keep those running it has a HIGH probability of either “blowing stuff up” or burning out components. Because while the first type of tablet DOES boot “properly” with the boot files for the “second type of tablet” I’m working on, those boot files will FAIL thermal control, charge control etc. (NOT saying that this is the case here, but an important lesson to know for possible future ‘hacks’ 😊).
The LED should however always be on usually. It will change color when it’s charging or blink when it’s reading that the battery is empty (at least with the default/common config that is 😉)
USUALLY it should be sufficient to just replace the DTB’s but if the boot.ini for example is configured differently (or that specific dtb does require extra parameters in the boot ini), then yup, you also need to replace those 😊👍🏽
And yups: Y3506_V03 is indeed they Soy Sauce 😊👍🏽
Short ‘tutorial’ (since there are actually A LOT of Linux partition/filesystem tutorials out there 😊, so making yet another one would most likely just cause clutter😊):
Very simple put:
Your boot partition has 4 important primary files:
boot.ini which is used to configure/setup the boot and how to boot/load things
image – this is the actual kernel on which it runs
xxxx.dtb – Device Tree Blob, which basically tells the kernel which hardware is connected and how (addresses and such)
uInitRD – VERY simply put an inital RAM Disk with drivers and scripts which is used during boot to mount the actual OS (Ubuntu/ArkOS)
The boot partition is almost always a FAT32 partition
then Linux (Ubuntu/ArkOS in this instance) itself is on a partition which can be ALLLL kinds of filesystem formats, commonly used is ext4 though, and that one is ‘the root’ (/), Not to be confused with the user root (the system admin, which you should basically NEVER use unless you REALLLLLYYYY know what you’re doing and WHY you need ‘him’ 😉)
And the roms partition is formated in exfat (IF I recall correctly), which can be natively read by both Windows and Linux, so that users can just easily manage their roms on a Linux, Windows or even Mac machine 😊
IF you are interested in how the Linux file system works more deeply, then I would definitely recommend watching some (linux) beginner friendly videos on YT about it. There are quite a few which explain /dev /etc /usr /bin etc 😊
Thanks for your absolute positive feed back, and your absolute persistent DIY attitude 😊👍🏽 Love to see that more these days.
OH! And of course thank you very much for returning with your feedback. This doesn’t only help me in knowing you have seen my message, knowing it wasn’t for nothing. But it might also help others stumbling upon your replie(s) in the future, and possibly even helping them fix their Soy Sauce R36 😊👍🏽
Linux – Installed already ubuntu on a vm to learn more ans starting to like it. Planning also to find an old pc to have the real feeling 🙂
I understand – my mistake was ignoring copying the also the image file( kernel).
Motivated by your advices put the all the original boot partition files, because now i know (from shiped original sd card arkos 08232024 aeux) and everything is working wonderfull no issue at all with the latest arkos version (06302025-1) on the new sdcard.
So i understand that the os/root seems to be on that second partition that is hidden/ not recognised on windows maybe because ext4.
Another question please: It is safe to do this: all (boot partition) files from original arkos with a new arkos version? Because I am planning to do only like this when updating – keeping original boot files.
Also you where right with the first solution “remapping” and mixing boot files is messing things:
1) I think it was running hot, now the console runs cooler.
2) Also Fixed headphones – great adition – was thinking it was a “hardware issue in the jack” when pluging heatphones also the internal speaker was working.
Will need to test if charging works corectly ( if the red light will turn off when full).
I am still amazed how many things can do on this device. Now i can enjoy ported games/ running programs/ playing with terminal on such a litle pocket device.
Onestly – Thank you!
Nice 😊👍🏽 I personally have been running Linux on my/our servers for years (from Red Hat to Fedora, to SuSe (all the way back to 9.0) to even Ubuntu). “Recently” I’ve switched all our desktops full time to Linux due to all the crap going on with Windows 11😊
Ahh of course, totally my oversight, the “Chinese one” probably likely had a different/modified kernel or what ever to account for the different hardware (Tip: you can see this when using the command uname -a, this will show the kernel version 😊)
In regards if it’s safe, yeah I think so, it SHOULD not be a problem, there is however a SLIGHT possibility that the original kernel (if you really need that one indeed), might identify differently, or that it’s compiled with (slightly) different modules causing the Official ArkOS not to recognize certain hardware, or that certain emulator MIGHT not run (properly). HOWEVER, I personally think these risks are relatively low, especially since you already stated that everything seems to work normally now for you 😊.
In regards to what these little things can do:
Yeah funny thing is, that I program and make A LOT of small tools for these little Linux PC’s (because that’s what they basically are at this point😂), and I turn out to be MUCH MORE working on project FOR those devices than do actual gaming on them, out of choice, not because they keep going defective (not at all even). Even more ironic, I have been working nearly a year now on those things, and for years I could not be bothered with Linux for desktop use, and even though it’s obviously VERY different on these devices vs pc? They did played a part in making me take the final decision to fully switch😂. Now basically everything here is running Linux, from the servers to the vacuum cleaner (don’t ask😂), to our laptops, surface tablets, desktops and our hand held consoles 😊
If you ever get into (or maybe already are🤷🏽♀️) scripting or programming stuff for them, I would highly recommend downloading Microsoft VSCode. You can work on UNC with it (meaning you can have the source files ON the R36, write/update them on your PC (either Windows or Linux), and then compile directly on the device via the build-in SSH terminal in VSCode. Why I’m often doing it like this? Since you then don’t have to mess with setting up cross compilers on your PC (for the ARM CPU etc), then copy the compiled file(s) to the R36 to test etc etc 😊
You’re welcome, and it’s seriously neat to see someone this enthusiastic😊👍🏽
Thanks for all your advices. I will test also oficial arkos rom.
Also I will follow your posts for new content 🙂
Good luck with your work!
Hello, I’m having the exactly same problem you had, could you please upload the archives that fixed the inverted axis trouble? I have no idea how to do this, thank you!
Hey, first have to make sure that you are indeed using the latest (Official or Community) ArkOS (since there can be a problem with the Chinese bootfiles (dtb). AND that you actually have a real R36S or R36H, because it could just as well like with the user CannotCannot be that you don’t have an “Official R36” but an “Soy Sauce Console” for example. Which means you simply need the official boot files. for that one (which I don’t have though!)😊.
I would NOT recommend just messing with system files yourself (in the Root partition that is) if mappings are incorrect. Because incorrect mappings most likely just indicate that you are already using the wrong boot files. And then you would only see “just an inverted stick” but there can (and will be) much bigger/serious problems which you (initially) don’t notice like for example: Charge controller not functioning properly resulting in undercharging or even over charging the batter, overheating the console (incorrect power management) etc etc….
I would FOR AN SOY SAUCE model recommend checking this thread on GitHub: https://github.com/AeolusUX/ArkOS-R3XS/issues/95
On there is also a link provided to the correct bootfiles download 😊. IMPORTANT: Do make sure you confirm which device you exactly have!
Good luck😊👍🏽
Thank you so much! Everything is fine now!
IF ANYONE IS HAVING THE SAME PROBLEM, YOU CAN TRY DOWNLOADING THE BOOT FILES CALLED Y3506.boot WHICH CAN BE FOUND HERE: https://github.com/AeolusUX/ArkOS-R3XS/issues/95
Hi,
not sure if this is a dutch website, but i followed your tutorial exactly but my R36S still won’t boot. It shows the flashing red light everytime i try to turn it on. I tried every single OS version there is to download, even the ones for the clones. It still won’t turn on, screen says black with a red flashing light. I tried every single file for the screen (original, V1, V2, V3, V4, V4 60hz) but nothing works. What am i doing wrong? i’m about to go crazy on this stupid device. please help! (maybe i could type this in dutch too, idk hahaha)
thanks!
Hey Johannes😊.
Nope it’s indeed not a Dutch website, I’m Dutch myself though, but I’ve chosen to make all my content (Video’s, Website, Software and other projects) in English so everyone can benefit from it and not just our ‘Tiny Country’ 😉😊). So thank you for taking this into account and commenting in English (since your problem might also help others world wide when they come across it now😊👍🏽).
I’m strongly suspecting yours MIGHT not be a ‘real R36S’, which might cause the problem. First let me ask this (and please DO NOT feel insulted😉😂, but it COULD be an problem with booting with these devices): Have you made sure it’s fully charged? Although USUALLY when the battery is too low it will just give an on screen text error provided by the bootloader/ArkOS instead of the blinking red LED.
I do however still strongly ‘believe’ yours is unfortunately a clone which would explain the current issues you’re having. I myself can’t confirm it directly, but the symptoms you’re describing match VERY closely with what I’ve heard, read and received from other developers and users whom turned out to be having an “Emulec Clone”/K36. I would recommend trying one of these links/resources to see if those will help you further:
https://handhelds.wiki/R36S_Clones#Custom_Firmware_for_the_EmuELEC_Clone
And the download from AeolusUX:
https://github.com/AeolusUX/ArkOS-K36
I THINK these will solve your problem 😊. Do you still have the original SD card though? Because if you still have the original SD-Card AND the files that where on it, then you can compare the boot files and try to swap those as a last resort. But I would recommend to just try the K36 version of ArkOS by AeolusUX😊.
IMPORTANT: Like mentioned in all my tutorials: Please DO NOT use the original SD-Card for your new installation! Those WILL be problematic and eventually even just die randomly. (They are VERY low quality SD cards)..
Good luck and keep me up-to-date if you like if it worked😊
Hi! I was following your tutorial and when I got to the Display Drivers I got a message saying my file doesn’t match any of the 4 possible ones. Now, I know I don’t have a replica, the file I have is called “rk3326-rg351mp-linux.dtb”, I can see the two RAM chips and I bought it from BOYHOM. How can I fix this? Thanks!
Sorry, I didnt’ noticed your comment any sooner, we’ve had quite an hectic week. I thought I had covered that in the blog post, but it turns out I did in the video, but forgot to cover it in the blog post, my apologies. I did now added a section about that issue in it.
But basically put, you can just try then one-by-one to see which one does work. But most of the time a non recognized one just turns out to be a slightly modified Panel 4 dtb file (hence why it’s not recognized). If they all fail to boot, you can always try to fallback to the original backup of your “official” SD-Card and just copy those bootfiles to your R36 once it’s done installing 😊
Thanks for the tutorial. It’s really dummy-proof and really hard to mess with. Worked for the old ArkOS on my R36H but had weird result and had hard time with the new dArkOS (strangely only worked when flashed with balena etcher…). I would recommend updating your tutorial (and some testing youself) with the new dArkOS because the old ArkOS won’t be updated anymore.
Short tutorial : download the latest dArkOS in the github repo, flash it with your prefered flashing software (rufus, win32diskimager etc), when finished, place your own “rk3326-rg351mp-linux.dtb” backed up previously to the “boot” partition, eject and insert in your R36H/S and let it boot/expand.
Thanks for your comment, however the Debian Based ArkOS (dArkOS) is as far as I know the same procedure to run use the tutorial😊
I’m GUESSING (can’t confirm because I personally will most likely not be moving do Debian based, but instead have by own Ubuntu based custom Distro for these devices with the latest LTS base).
But same as for ArkOS, christian yet again strongly advices AGAINST using Balena etcher:
“DO NOT USE BALENA ETCHER WITH THIS IMAGE! There has been reports of various strange issues and inconsistent performance using Etcher for this image.”
I don’t know why, I never used balena etcher (I use other more direct tools on Linux), and don’t know WHY it would be the case what he is reporting, but considering he states that for his project I will just stick to his guide lines in regard to that.
I DO acknowledge your comment though, because there had been a few people in the past who told me that it didn’t worked with Win32imager or even rufus and that they DID had to use Balena.. I’m GUESSING it has something to do with the sd-card, the card-reader or maybe even some drivers which are different on different pc’s 🤷🏽♀️
For anyone struggling with the screen or getting past the 1st boot, according to the test Tool I should use the original screen files. Well they didn’t work, none of the files did. But I was running ArkOS up to the latest 2025 update.
I still had the original files (I even have org SD intact from when it was delivered), here’s what I did. After Image was ready, I copied these files to the boot partition from orginal sd:
rg351mp-kernel.dtb and rk3326-r35s-linux.dtb
rename rk3326-rg351mp-linux.dtb to .image.org or something if you want to keep it.
Make a copy of rk3326-r35s-linux.dtb and rename the copy to:
rk3326-rg351mp-linux.dtb
This was the trick to get my R36s working with dArkOS
None of the .zip files gave me a working screen.
Correct😊 but this has already also been explained in the ‘fold-out-section’ about if your screen would not be recognized 😊.
The problem is that there are A LOT of different devices (ESPECIALLY the R36S units) which use slightly different hardware. Most likely for them to save a couple more bucks on production I don’t know🤷🏽♀️. But due to that inconsistency it’s just getting a big hell more and more to keep maintaining all files for the R36S units. The real units are in general not an issue, and will most of the time work perfectly fine. But indeed (also like stated in the tutorial); sometimes you do might need to use your original files..
Would you be willing to email me a copy of your original boot files for analysis? You can also post me a link to a dropbox, google drive, wetransfer etc if you prefer 😊.
I’m currently working on a distro for more advanced users and would like to know about other panels and their data if needed.. Could you also provide me (IF visible for you) which version and board date is printed on the PCB of your R36S (Often found underneath the battery and looks something like: R36S-V12, 2023-08-18 for example😊
I actually have the R36S-V12 2023-08-18 board check:
https://drive.google.com/file/d/1LmoFaKZpSzhpzRgdfZfYg50-0o0T5w94/view?usp=sharing
The files I used to get dArkOS running:
https://drive.google.com/file/d/133M-eq4cQhKzskTuTN38PSM6SRmvUtTc/view?usp=sharing
If I check the r35s file with your tool, I says I have the original version without FN button, however my device does have one.
Thank you VERY much for supplying the files, helps greatly in debugging which one you truly have 😊. I have decompiled the file:
rk3326-r35s-linux.dtb (because that is actually the one used while rg351mp-kernel.dtb is the one for the boot system (they use VERY wrong naming conventions for those files).. The rk3326-rg351mp-linux.dtb one is not used, the only need two dtbs with those devices.. and your screen/display initalization sequence don’t match the original panel 0 for 100% (which is a LONG line which looks like this: “panel-init-sequence = [39 00 04 b9 f1 12 83 39 00 06 b1 ………”
But when I tested YOUR rk3326-r35s-linux.dtb on my panel 0 R36 (be coincidence also a purple one😂) and EXACTLY the same version AND board date (R36S-V12 2023-08-18), it did booted just fine.
The “Without FN Button” however means that the dtb file is MOSTLIKELY not configured properly for that, it does not mean your device doesn’t have the FN button, but that it just won’t work (the button that is, the display most likely will😊).
The files you’ve used.. are those from your original SD-Card, or ‘partial experimental copying’ from downloads for example? 😊
Again: Major thanks for supplying these details, since it also GREATLY helps me make my Advanced OS specifically for the (Real) R36 units much more compatible 😊 (Files delivered by others will be appropriately credited btw of course)
These are the files supplied with the device. I still have the original SD card. At first use I started with 2 new SD cards, so I put games on SD2. On the new SD i installed the latest ArkOS available, and used the files on the original SD to get it working. And now to get dArkOS working. But my screen wil not work with any of the other files.
Thanks, I will add them (after properly patching them) to my Distro properly crediting you. I have noticed a small difference and despite the fact they are a SLIGHTLY different than the Panel 0 files I have (which come from my purple R36S with the same board date), both my Purple R36 (same as yours) boots perfectly fine with with it. BUT strangely enough my latest Black R36S (board V22 2024-12-18) ALSO boots with it perfectly fine… BUT!!! If i use the original SD-card which came with each of those units and swap the cards? Nope no screen or a white screen with striping…
So definitely worth some investigation and an add to the selectable bootfiles in the Distro I’m building..
Most important part is that you got yours working, and therefor I also truly appreciate you kept taking your time to keep replying😊👍🏽
Having the same issue. Tried your fix and unfortunately it didn’t work for me as I didn’t have the rk3326-r35s-linux.dtb file in my original boot folder. I had the following dtb files in my original boot folder: gameconsole-r36s.dtb , rg351mp-kernel.dtb , rk3326-rg351mp-linux.dtb. I just received my R36H from Gamelabs. Using the panel checker I learned I have a V4. Tried both V4 panels offered here. Happy to see some updates in this thread the same day that I was trying to get mine working. I did swap out the SD card for a sandisk card.
R36H you say with issues that the panel doesn’t work😳, pleaseeeee don’t tell me they (in China) started messing with the R36H screens also now🤦🏽♀️….
For anyone struggling and not being able to figure out the exact issue with the main tutorial:
You basically need TWO dtb files… One if for the booting process and the second one is for linux ((d)ArkOS itself). BUT how they are named can be different unfortunately. You can however open boot.ini to see how the linux one (the most important one) should be named:
load mmc 1:1 ${dtb_loadaddr} rk3326-rg351mp-linux.dtb
that line shows the filename ‘rk3326-rg351mp-linux.dtb’ in this example.
But (like stated in my main tutorial also) IF you can’t get it to work at all… you can also as last resort try to just copy the dtb files and boot.ini from your original SD-Card/backup to the boot partition of your new card to see if that works 😊
I’m sorry I can’t be of more assistance with ‘direct instructions’, but they unfortunately make it absurdly complex for regular users by constantly changing the filenames, displays and sources they copy the distributions of the operations systems from. Which also makes it nearly impossible for me to keep up with all the random stuff each reseller keeps doing (often even without truly understanding what they are doing).
Hope this information helped you (or some others) a bit further though if issues arise.
Hi Rico! Thanks for getting back to me. I loaded the original boot files and still no luck. Here’s what I had in my boot.ini file.
load mmc 1:1 ${dtb_loadaddr} rk3326-rg351mp-linux.dtb.
When trying to use your original boot files, should I wait for the initial install to finish before powering down and subbing with my original boot files? Also, when replacing with the original boot files, should I should be doing a file replace and leave existing dtb files or should I clear all dtb files and boot.ini file before dropping in my original files? I’ve tried all sort of combos!
Anyways, I understand that you do not have the time to troubleshoot every issue so I really appreciate anything you can offer.
No worries😊
And yes, you should indeed 100% certainly WAIT about 2-3 minutes before turning it off if you don’t have video on during the first boot. The reason for this is that ArkOS is re-partitioning the SD-Card to it’s maximum size and if you interrupt that process there is a very high probability it won’t be able to boot properly at all anymore.
IF you however already know which files you need, then you can often just prepare the sd-card in your pc, then also (before inserting it into your R36) copy the dtb files to it and then do the first boot instantly with screen and all (which I also often do myself). But then you do already have to know which boot files you have.
I’m however very interesting to learn/discover if “you’re doing something wrong” accidentally so to speak, or that there now (unfortunately) also ready is an imitation R36H or one with yet another display panel we haven’t heard about yet.
Not only to possibly improve/update the text tutorial (this post) if needed, but also to see if I would possibly need to make an update for other R36H units for example..
Is there a possibility that you can upload the .dtb files from your original SD-Card to something like a googledrive or so and post the link here? (So I can investigate them?)😊
You could indeed also just try to remove all .dtb files and replace them with the ones from the download (or your original for that matter) if you can’t get the new ArkOS to work….
IF you really have an (real) R36H, then it most likely is just the Panel 4 you’ll need. I PERSONALLY haven’t seen any other R36H units yet (and I have about 20 of them, with various board dates).
the rk3326-rg351mp-linux.dtb in your boot ini means it uses that file as loader for linux indeed. You could just go ‘nuclear’ and indeed just remove all .dtb’s and the boot.ini file and then drop the new ones into that drive to see if you can get it to work.
IMPORTANT!!!!!! There are some other files on there (image and uInitrd for example), whatever you do: DO. NOT. REMOVE. THOSE😉😂. Those are CRITICAL to keep, I could in detail explain what they are but the reply is already turning into a book for you😉. In short: that is THE Linux kernel and the initial bootloader used to load Linux. Without those, nothing is going to happen ever either 😉
Good luck and keep me posted please😊👍🏽